Pages

Monday, February 29, 2016

Vivid Greetings - Part Three and Four

Here are cards #3 and 4 using the Stampin' Up! set called Vivid Greetings. I had this rose-colored piece of cardstock sitting on my table that had been cut with a Memory Box Stitched Rectangle die, so I used it for this card. One less piece to put in my Card Parts box:) I stamped the "For my Friend" with black near a corner. Then I masked it off and stamped all around it with an Inkadinkado stamp. I matted with black and added it to a white card base. I also added a black enamel dot to the flower center.
A Thank You card using the last sentiment stamp of this set. I still have two small stamps to use. (A heart and a candle. I'm not quite certain I will use them.) I stamped and matted with SU! ink and cardstock. The background is some patterned paper I've had for years. (I have SO much, and I really do love almost all of it, but it never seems to work out to use it!) I matted it with the same color cardstock as the sentiment. The sentiment is mounted on foam squares.

Thanks so much for stopping by, and I hope you'll come back and visit again soon!

Thursday, February 25, 2016

Color Swap Hello

I made this card for a swap in our stamping group. It's a color challenge and the colors are two shades of pink. I stamped the "hello" (from Stampin' Up!'s Vivid Greetings) with a lighter pink. I mounted on foam squares. I cut the layered panels with Memory Box stitched dies. The swirl was done with a Memory box die, also. I used a Darice embossing folder on the white layer.

I am linking this up to the CropStop challenge, which is "Anything Goes."

Edited to add: Suzy - this card is standard A2 size - 5.5 x 4.25.

Thanks so much for stopping by, and I hope you'll come back and visit again soon!

Wednesday, February 24, 2016

A Two-Fer

Two cards for the price of one today:) This first one is using the next set in my Stampin' Up! stack. It's from the set called "Vivid Greetings." It consists of four sentiment stamps like this one, and two small stamps. This first card is a guy card. Well, really they both are, I guess. I stamped the greeting, then cut it out with a Memory Box Stitched Rectangle die. The background (which is really the foreground!) is a piece from a Die Cuts With a View matstack. I cut the opening with the same Memory Box die. I mounted the wood-grain piece on foam tape to frame the image/sentiment.
Of course I had to use the piece that was cut out, too. Didn't want to add it to my card parts, so I made this card right away. I die-cut a frame for it and added both pieces to a piece of scrap cardstock. I mounted this on foam squares. The sentiment is from Heidi Grace. The background piece was cut with a stitched rectangle die, also, and embossed with a Darice embossing folder.

Edited to add: I am submitting these cards into the CropStop.com challenge. The challenge is Anything Goes. I purchased my Stitched Rectangle dies from CropStop, and have ordered other things from them over the years, also!

Thanks so much for stopping by, and I hope you'll come back and visit again soon!

Monday, February 22, 2016

Vertical Greetings

One more small step on my journey to use all of my Stampin' Up! stamps. The set I'm using today is called "Vertical Greetings." It consists of ... surprise!! ... four greetings that go up and down:) These cards are all the same. I stamped the sentiment, colored with Copics, added some Stickles or Diamond Glaze, matted and mounted on foam squares. Then I added ab embossed bottom layer. This embossing folder is from Darice.
 This embossing folder is from Darice.
 This is an old embossing folder from Cuttlebug.
This embossing folder is from Darice, also.

Thanks so much for stopping by, and I hope you'll come back and visit again soon!

Tuesday, February 16, 2016

Watercolor Minis

Well, I finally have returned to my project of using all of my retired Stampin' Up! sets. I think I am about half done, but I had put it on hold for several months. We'll see how long I can keep it up this time. I feel "stifled" by it.

The set I'm using today is called "Watercolor Minis." It consists of twelve small, two-step stamps. For this first card, I used four of the stamps - two for the leaves and two for the roses. I randomly stamped them on the cardstock. It looked a little plain, so I added the "bling." The "Celebrate" is from the set called "Wonderful Words."
For this card, I used the other eight stamps. The sentiment is from Papertrey Ink. I matted with olive cardstock and mounted on foam squares.

Thanks so much for stopping by, and I hope you'll come back and visit again soon!

Monday, February 15, 2016

With Sympathy

I should have posted this card with these cards, but it wasn't finished yet.

This little piece of patterned paper was left over after making those cards. I couldn't just toss it, of course:) So, I trimmed it down a little bit, added the sentiment (from Papertrey Ink) and matted it with black. Then I took some white cardstock and embossed it with a Darice Brick Wall embossing folder and matted that with black also.

Thanks so much for stopping by, and I hope you'll come back and visit again soon!

Sunday, February 14, 2016

Ferny Birthday Wishes

This card uses the last of the "card parts" that were still laying on my table waiting to be used. The "tablecloth" is left over from this card. I just can't throw away those little pieces! I added it to a piece of lavender textured cardstock. The tiny sentiment piece was a card part, too. I would guess the die-cut piece was cut using a die from Spellbinders, but I'm not 100% certain. The sentiment is from a set by Papertrey Ink. I mounted the little panel on foam squares. I stamped the vase (from Gina K) on patterned paper, then strengthened it with cardstock underneath it. I stamped the ferns (from the same Gina K set) and then added the vase, mounted on foam squares, also.

Thanks so much for stopping by, and I hope you'll come back and visit again soon!

Saturday, February 13, 2016

Hoppy Day

This card started out with a scrap of embossed cardstock, which I eventually tossed. It was a funny color, and although I chose these stamps to coordinate with it, I didn't really like the combination when it was ready to put together. I like this better.

The green cardstock was embossed with an embossing folder from The Paper Studio. All of the stamps are from a set from Papertrey Ink. I colored with Copics, added googly eyes and also Star Dust Stickles to the fly's wings.

Thanks so much for stopping by, and I hope you'll come back and visit again soon!

Friday, February 12, 2016

Thanks

Another card part:) I'm working like crazy with them - and having such a great time!

I found this angled, die-cut piece in with my parts. I wish you could see the texture of it - it's almost like a textured vinyl.  I'm sure I used the "positive" of it years ago. I liked the angle, so I left it. I placed it on a piece of blue cardstock and then scored three parallel lines with my Scor-Pal. The cardbase is white.

Thanks so much for stopping by, and I hope you'll come back and visit again soon!

Thursday, February 11, 2016

Birthday Owl

Years ago, I used a texture plate to emboss a full card-sized piece of this colored cardstock. (I don't know what color to call it!) I cut it in half for this card and added it to an ivory cardbase. Then I chose to use this already-cut scalloped circle, which was done with a Spellbinders die. I cut an ivory circle to fit inside the scallops. I stamped the dotted circle with a Papertrey Ink stamp. The owl is from Inkadinkado. The sentiment is from Hampton Art. The circle is mounted on foam squares.

Thanks so much for stopping by, and I hope you'll come back and visit again soon!

Wednesday, February 10, 2016

Ladyslipper Just For You

I've had this die-cut doily for years, too. (Thanks again, Annie!)

I cut a piece of "mottled" pink cardstock for the bottom layer. I sponged pink ink along the top, bottom and right edge. I trimmed down the doily to fit right along the edge of the cardbase. I sponged the pink ink around the edges of the doily except for the left edge. I stamped the ladyslipper, which is from Repeat Impressions, and colored with Copics. Then I stamped the sentiment, which is from Hampton Art.

Thanks so much for stopping by, and I hope you'll come back and visit again soon!

Tuesday, February 9, 2016

Christmas Wishes

This colored snowman image was left-over from when I made my January 2013 calendar. (So, I made it in January of 2012, likely, or shortly after that!) 

The image is from Stampin' Up!. I colored it with Copics and added some sparkle with Star Dust Stickles. I matted with black and mounted on foam squares. The sentiment is from Paper Smooches. I cut the bottom layer using one of my Memory Box Stitched Rectangle dies.

Thanks so much for stopping by, and I hope you'll come back and visit again soon!

Monday, February 8, 2016

Wedding Bells

This is another piece that has been in my cards parts for several years. I had already stamped the image and the sentiment and colored with Copic markers. The image was stamped with Versamark ink and embossed with silver embossing powder. Both the image and the sentiment are from Repeat Impressions.

I scored a line along each edge of the image panel and then matted it with silver paper. I mounted it on foam squares. The background was embossed with a Darice embossing folder and matted with silver, also.

Thanks so much for stopping by, and I hope you'll come back and visit again soon!

Sunday, February 7, 2016

Letting the Paper Do the Work

This paper has been in my stash for many years. It was free with a purchase at Archivers long ago. It came in 8 x 8 sheets. I cut it in half, and then cut them to fit on my card fronts. I matted with a matching blue cardstock. Then, I just added sentiments! This first one uses a sentiment from The Paper Company.
For this second one, I used a stamp from Paper Inspirations.

Thanks so much for stopping by, and I hope you'll come back and visit again soon!

Saturday, February 6, 2016

Fairy Happy Birthday


I spent some time in my stamping room last night and put a few cards together. Nothing earth-shattering, for sure, but it felt good to be in there and to use up some more "card parts."

I've had these two digital images all colored up and the wings glittered for quite a long time. Probably four years or more! Well, they are out of the pile and on to a couple of birthday cards, finally. They are from Tiddly Inks and are colored with Copics. I used Star Dust Stickles on the wings. The sentiment on each card is from Papertrey Ink. Just for fun, I added a couple little gems to this first card. I matted each image with black.
I have a few more posts coming up, too. Yippee for me:) I had fun!

Thanks so much for stopping by, and I hope you'll come back and visit again soon!

Thursday, February 4, 2016

Bicycle Birthday

Again - card parts! This bicycle image has been in my card parts for several years. It was from a friend in our stamping group from Canada. Thanks again, Annie!

I don't know what company makes the stamp, but it was stamped on black and embossed with white sparkly embossing powder. I wish you could see the glimmer! Also on my table was this die-cut panel. It uses another die from the Distressed Addington Collage die set from Memory Box. I put some black cardstock behind the cut-out. The sentiment is from Papertrey Ink. I mounted the entire panel on foam squares. Enjoy!

Thanks so much for stopping by, and I hope you'll come back and visit again soon!

Wednesday, February 3, 2016

Christmas 2016

My first Christmas card for 2016. I really, really would like to use up my card parts. I truly thought it was an unobtainable goal, but I'm making some progress. (I also want to use all my SU! stamps, my stickers, my patterned paper, etc. :) ) So, this is another "card parts" card.

The "Joy" is a layered dimensional sticker from Pooch and Company - from the dollar (well, what used to be the dollar area) at Michael's. I've had the stickers for several years. This one was already mounted on the green diamond. I glued it on a piece of textured ivory cardstock and matted with a matching green cardstock. I stamped the sentiment, from Verve, in a coordinating ink.

Thanks so much for stopping by, and I hope you'll come back and visit again soon!

Tuesday, February 2, 2016

One-Sheet Wonder

I have, for a long time, wanted to try the "One-Sheet Wonder." It was finally time:) My friend, Michele, has this post of her design for cutting the 12 x 12 sheet, and also the cards she made with her pieces. Looking back at it now, I see that she matted her pieces with black. I like that better. Wish I had matted mine! Maybe next time. Anyway, here are my fourteen cards. All cardstock is off-white. I will put my cards in the order of Michele's pieces. I cut my pieces the same as hers (with a little exception) but didn't follow her layouts for all of them. I used a Memory Box die for the rectangles with sentiments in them.
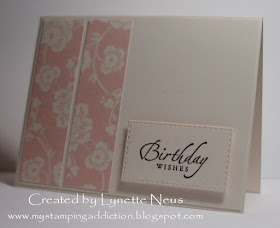
This first one uses a stamp from Stampabilities.


Stamp from Papertrey Ink.


Stamp from Verve.


Stamp from Stampabilities.


Stamp from Papertrey Ink.


Stamp from Impression Obesssion.


Stamp from Stampabilities.


Stamp from Stampabilities.
Stamp from Impression Obsession.
Stamps from Verve.


Stamp from Stampabilities.


Stamp from Inky Antics.


Stamp from Stampabilities.


Stamp from Stampin' Up!

Thanks so much for stopping by, and I hope you'll come back and visit again soon!

Monday, February 1, 2016

February Calendar Page

Time for a new calendar page - February is here already!

I used a very old die Cuttlebug for the heart and its layers. The white background was embossed with a Darice embossing folder.

My calendar files are available for your use, if you'd like. The links are under the blog title. I'd love to hear from you if you use them!

Thanks so much for stopping by, and I hope you'll come back and visit again soon!