Showing posts with label Lasting Impressions. Show all posts

Wednesday, October 26, 2022

Thanksgiving - Using Up Paper #5

And here is the last card - finally using up the Lasting Impressions patterned paper I got from a friend several years ago. Thanks, Vicki! I told you I would use it up. 😊 The center panel is a slightly "textured" pattern. I added very thin cardstock strips between the two patterns. I used a decorative circle die to cut the base for the ephemera pieces. The ephemera is from Gina K. The front pumpkin is mounted on foam squares. The sentiment is from Gina K, also.

Thanks so much for stopping by, and I hope you'll come back and visit again soon!

Monday, October 24, 2022

Thanks - Using Up Paper #4

Both of these slightly patterned papers are from Lasting Impressions. The stamps are all from Gina K. I added a gold, metallic sticker strip between the patterns. The stamping was all gold embossed. The card base is ivory.

Thanks so much for stopping by, and I hope you'll come back and visit again soon!

Saturday, October 22, 2022

Thanks - Using Up Paper #3

The center panel is a "textured" tannish. It and the purple stripes are from Lasting Impressions. The stamps are all from Gina K. I added glittery purple sticker strips along the center panel and also some iridescent sequins from Gina K.

Thanks so much for stopping by, and I hope you'll come back and visit again soon!

Thursday, October 20, 2022

Anniversary - Using Up Paper #2

Two more cards using up the Lasting Impressions patterned paper from a friend. Identical except for the "adornments." This first one has iridescent sequins and the second one has Nuvo drops. Both designs are from the package. I added thin, metallic sticker strips beside the dotted/heart paper. The sentiments are cut out of light purplish glitter cardstock and layered up.

Thanks so much for stopping by, and I hope you'll come back and visit again soon!

Tuesday, October 18, 2022

Anniversary - Using Up Paper #1

I got some Lasting Impressions patterned paper from a friend several years. I finally got it all used up!! I will be sharing the cards over the next several days. The papers on this first card are the dotted piece and the striped floral piece. I matted the dotted piece with red and also added a thin strip of red  beside the floral piece. I die-cut the sentiment from red glitter cardstock and also two other pieces from white for layers.
All of the papers on this card are from the same pack of patterned paper. I added thin strips of red between each pattern. The sentiment is die-cut from a light purplish glitter cardstock and layered up for dimension.

Thanks so much for stopping by, and I hope you'll come back and visit again soon!

Sunday, October 31, 2021

Flowery Anniversary

Using up some more patterned paper! I'll get this one used up very soon. :-) The patterns are all from the same pack. I had already cut out the flowers that are on the bottom portion, and I added them with foam squares. The sentiment is from Inky Antics. This card is 4 x 6 inches.

Thanks so much for stopping by, and I hope you'll come back and visit again soon!

Thursday, April 22, 2021

Stair-Step Anniversary

A few years ago, I cut several stair-step cards to send to a friend. I also cut a few for me. I have finally used the last one. I do like them, but I am not good about figuring out what to put on the all spots, since I am such a "clean and simple" card-maker. I basically just covered this one with patterned paper. The papers were all from the same matstack from Lasting Impressions, I think. I had gotten them from a friend several years ago at one of our Group Gatherings and I had promised to use them. I'm still working on them, Vicki! The main piece had the heart already on it. I had another piece with the same heart in a square, so I cut the second one out and mounted it on foam squares over the first one. I cut thin strips of the stripes and added to the sides by the heart. You can't even see the center step, but that one is covered with a printed ivory piece. I added the same dotted pattern to the furthest-back panel. I used a piece of textured ivory cardstock for the sentiment panel and added matching stripes to that. The sentiment is from Inky Antics.

Thanks so much for stopping by, and I hope you'll come back and visit again soon!

Monday, July 20, 2020

Holly Christmas

I happened across this brass stencil one day and had to use it. It's from Lasting Impressions. I used some nice holly stickers in five of the six squares. I added the sentiment (from Papertrey Ink) in the sixth square. I matted with red and mounted on foam tape.

Thanks so much for stopping by, and I hope you'll come back and visit again soon!

Tuesday, March 10, 2020

Glittery Presents


I had a friend over to play on Friday, and I made five cards. Only three different designs, though. This is the one I made to show her how easy it was to use stencils and glitter. I totally messed up a few times! LOL!

At any rate, I did end up with this one. I used a Lasting Impressions brass stencil and some sticky paper, along with Martha Stewart glitter. I mounted the panel on foam squares. The sentiment is from Papertrey Ink.


Thanks so much for stopping by, and I hope you'll come back and visit again soon!

Monday, May 13, 2019

More Lasting Impressions Paper

Two more cards that I made with the Lasting Impressions paper that I've had for a long time. I'm getting closer to using it up:) I'm working on another card right now, but then maybe I'll put it away for a little while. All the cardstock that I used for both of these cards is from the matstack.

On this first one, I cut the flower and the leaves out of the cardstock and added them to the dotted piece. I added the stem, and also the black around the edge. The sentiment is a Mrs. Grossman's sticker. That panel is mounted on foam squares. I also added the black along the edges of the purple-striped piece. The card base is approximately 6 1/4 x 3 1/2.

The sentiment on this one is from Hero Arts. The large heart came printed on the paper with the dots. I added the three smaller hearts, cut out from another sheet. I used foam squares for all the hearts.

Thanks so much for stopping by, and I hope you'll come back and visit again soon!

Friday, April 26, 2019

More Lasting Impressions Papers

Both of these cards used paper from the Lasting Impressions pad that I got from a friend many years ago. Both of them use ivory cardstock. The stripes, the hearts (which I cut out and popped up on foam squares) and the dotted strip are all from the pad. The sentiment is an old Hero Arts wooden stamp.
The striped and flowered paper, the purple paper, the dotted strip and the hearts are all from the Lasting Impressions stack. 

Thanks so much for stopping by, and I hope you'll come back and visit again soon!

Saturday, April 20, 2019

"Instant" Cards

I have some lovely paper from Lasting Impressions that I got from a friend several years ago. I promised I would use it, and I'm still working on it:) Here are two cards that pretty much made themselves. The flower and stripes are all together. All I did was add the sentiments, which are from Papertrey Ink. For this first card, I embossed the black ink-stamped sentiment with sparkly embossing powder, matted it and mounted on foam squares.
For this second card, I stamped directly on the image, trimmed down the panel and matted with matching cardstock. Both cards have an ivory base.

Thanks so much for stopping by, and I hope you'll come back and visit again soon!

Tuesday, March 6, 2018

Recycled Daisies


I have another card to share with you today. It uses a piece that I salvaged from another card. It's possible this is its third card! Maybe I'll actually send it out this time. The "recycled" piece is the daisies. I trimmed around the edges for this card. They were done with a Dreamweavers stencil, embossing paste and glitter. I can't get the color to show up very well, but here is the card that was on my blog three years ago yesterday! In that post, I link to a tutorial I did on this embossing technique a long time ago. The sentiment is one stamp which I inked up twice - in black and green. It's from Paper Inspirations.

Thanks so much for stopping by, and I hope you'll come back and visit again soon!

Monday, April 3, 2017

Happy (Golfing) Retirement!

A good friend has just retired. (His last day was last Friday.) This is the card I made for him, with input from my husband.

I used a Lasting Impressions brass stencil for this. First I embossed the entire thing on off-white cardstock. Then I did parts of it on different cardstocks and paper. After embossing, I cut the pieces out and glued them on the main image. You can't tell very well in the picture, but the clubs are cut from "mirror" cardstock.

Thanks so much for stopping by, and I hope you'll come back and visit again soon!

Thursday, May 5, 2016

Using Up Patterned Paper

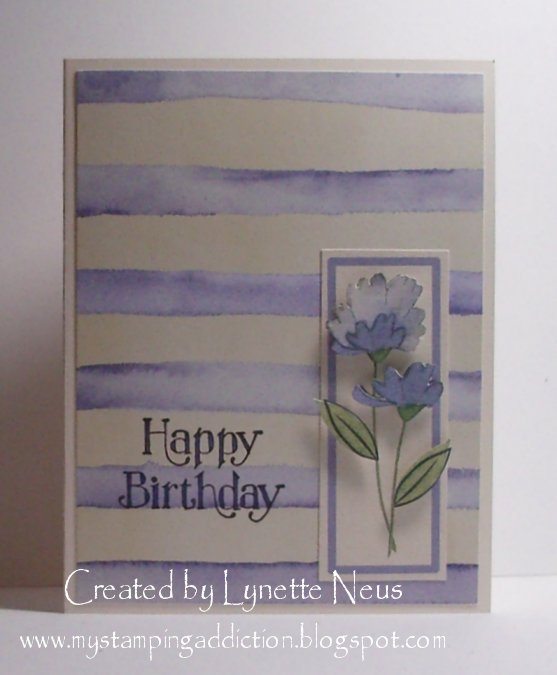
I've had this patterned paper for several years, and am using up some more of it. It's from Lasting Impressions. (Thanks, Vicki!)

I used some of the big striped paper for the background. The flowers in the rectangle were a part of another sheet. There were also some "loose" flowers and leaves on the same sheet. So, I cut them out and added them to the already-printed flower by mounting them on foam squares. The sentiment is from a Stampin' Up! set that is in my current stack. It's called "Favorite Greetings." I stamped it in black and added purple in the open areas with a Copic marker.

Thanks so much for stopping by, and I hope you'll come back and visit again soon!

Sunday, December 1, 2013

December Calendar Page

The last month's calendar page from 2013. Unbelievable!

The trees were embossed with a Lasting Impressions brass stencil. I matted with shimmery gold paper. The sentiment (from Denami) was embossed with gold embossing powder.

Thanks so much for stopping by, and I hope you'll come back and visit again soon!

Saturday, June 1, 2013

June Calendar Page

My calendar page for June. Still haven't started my calendars for 2014. Drat!

The main lady bug is made with a Lasting Impressions brass stencil. I embossed the lady bug on white and on red. I cut the body out of the red. I added the black with a marker. I matted with a shimmery silver paper. The background was stamped with a Studio G dollar stamp stamp. 

Thanks so much for stopping by, and I hope you'll come back and visit again soon!

Sunday, October 21, 2012

"Christmas Sunday"

Well, these two are the last of my Christmas cards for this year. Yippee!! I still have to stamp on the insides, but at least the outsides are all done. I have the labels ready for the envelopes, too. I'm keeping up with my plan to be ALL ready for Christmas by Thanksgiving.

Both of these cards use a Lasting Impressions brass stencil and embossing paste - different kinds of paste, though. This first one uses Glossy White paste. After spreading it through the stencil, I sprinkled it with glitter. I matted with white and mounted on foam squares. The background was embossed with a Sizzix folder.
This second one uses what is simply called "Embossing Paste." Before spreading on the paste, I stippled with Real Red. I added glitter to this one, too, and mounted on foam squares. The patterned paper is from Recollections and is matted with New Leaf from Papertrey Ink. The sentiment panel is matted with Real Red. The ribbon was laying on my table - from a package of some sort, I believe.

EDITED TO ADD: I'm linking these cards up the the Christmas Card Challenge blog once again.

Thanks so much for stopping by, and I hope you'll come back and visit again soon!

Sunday, October 7, 2012

"Christmas Sunday"

Another Christmas card done:) I'm linking it up to the Christmas Card Challenge blog.

The embossing was done with a Lasting Impressions stencil and my BIGkick. I colored the holly leaves and berries with Copic markers and added some red Stickles to the berries. The patterned paper is from a Recollections stack. The matting is all Real Red from Stampin' Up! I mounted the NOEL panel on foam squares.

We made a stop at JoAnn's last night, and I bought some Martha Stewart Christmas stickers with my 50% off coupon. After we got home, I made twenty cards with them! They are all about the same size and similar, but all different. (Except I think there were two that were identical.) The cards are all the same, with the different stickers. I will share them with you next week. That makes 74 done now - yippee!! Only about 5 - 10 left to make. I do still have to stamp the sentiment on on the insides, though.

Thanks so much for stopping by, and I hope you'll come back and visit again soon!

Sunday, February 19, 2012

"Christmas Sunday"

 I haven't done much stamping for about a week, so it felt kind of good to stay up late and work on a couple cards. I thought I'd do Christmas ones, since I didn't have any to share last week.


This first one was done using Natasha's Clean and Simple Stamping Fall-To Layout #178. You can find it here. I really like this layout. All three stamps that I used are from the same Inkadinkado set. I stamped them all with Versamark and embossed with Detail Gold embossing powder. The matting is shimmery gold. The image panel is mounted on Dimensionals.
I made this second one using an item from my "card parts" box. The trees were already embossed using a Lasting Impressions brass stencil with shimmery silver cardstock. I matted with Old Olive and embossed the sentiment (a dollar stamp from Michael's) with Detail Silver embossing powder.


I'm also linking this post to the Christmas Card Challenge blog, which you can find here. Since I pre-post my blog and their specific challenges start on Sunday, I can't do the themes for the week. But the real challenge is to get Christmas cards done!


Thanks so much for stopping by, and I hope you'll come back and visit again soon!