Showing posts with label Glitter. Show all posts

Wednesday, January 14, 2026

Glittery Christmas Greetings


Also included in Gina K's 12 Days of Christmas box were three small bottles of glitter - gold, silver and clear. I used a brass stencil and some double-sided sticky paper to add gold glitter through the stencil and then removed the stencil and added the clear glitter. I matted with gold mirror cardstock. I had already used a die to embossed the rectangle on the panel. The sentiment is from Gina K.

Thanks so much for stopping by, and I hope you'll come back and visit again soon!

Wednesday, July 14, 2021

Starry, Starry Birthday

For this card, I placed a die-cut piece on a piece of double-sided sticky paper. I added the glitter into the stars and pressed it down well. I matted it with black and added it to a white card base. The sentiment is also die-cut and is two layers thick.

Edited to add: Sorry - I don't know who makes the dies. The star one was purchased clearance at Hobby Lobby over a year ago. I was able to find another card I had made with it, but in that post I explained that I had already thrown the packaging away.

Thanks so much for stopping by, and I hope you'll come back and visit again soon!

Sunday, October 4, 2020

Glittery Flowers and Butterfly


Another one of my glittery cards. I threw away a different piece that was similar to this, but used different glitter and I really didn't like it! This image is from Repeat Impressions. I simply colored it with Copic markers. Then I added double-sided sticky paper to the entire piece, then added ultra-fine glitter over the top. The sentiment is die-cut and layered.

Thanks so much for stopping by, and I hope you'll come back and visit again soon!

Saturday, October 3, 2020

Glittery Balloons


I had fun with glitter for a few days. Here is one of the cards I made with it. I had a small piece of cardstock left over that had double sided sticky paper on it, so I used it to die-cut the balloons. Then I added Martha Stewart glitter to them in various colors. I added the strings with a fine-tip marker and matted with black. The die was in my card parts book.

Thanks so much for stopping by, and I hope you'll come back and visit again soon!

Wednesday, December 12, 2018

Left-Over Foil - Part 2

This card was made from the left-over foil piece from this card. It's rose gold foil. I used double-sided sticky paper for it. I placed the foil right onto the sticky paper, which was stuck to white cardstock. However, it was really hard to remove the foil from the snowflakes areas. I used ultra-fine glitter over the entire piece - to add sparkle to the snowflakes and to also cover the sticky. The sentiment (from Papertrey Ink) was stamped with Versamark on vellum and embossed with "Winter Wonderland" embossing powder - a white powder with glitter in it.

Thanks so much for stopping by, and I hope you'll come back and visit again soon!

Tuesday, December 11, 2018

Left-Over Foil - Part 1

After making this card and yesterday's card, I was left with the "negative" foil pieces. I tried a couple things that sounded like really good ideas in my "being awake at 4:00 a.m. but laying in bed" state. Neither of them worked very well, but I thought I would use them anyway.

For this first card, I placed Scor-Tape on white cardstock. The foil stuck nicely to the tape, but where the foil was missing from the foil sheet, the backing sheet was hard to remove from the tape. The snowflakes were sticky and I added ultra-fine glitter to them. (The foil is pewter.) The sentiment is stamped in black and is from a new-to-me set from Recollections.

Thanks so much for stopping by, and I hope you'll come back and visit again soon!

Tuesday, December 15, 2015

Positive! (And Negative, Too)

I came across these stickers while digging in my sticker drawer. Thought I really should use some, since I have so many. For this card, I used the "positive" sticker. It is silver, in case you can't tell by the photo. I placed it on sticky paper and added microfine glitter. Then I colored it with Copic markers. I matted with a pinkish cardstock and mounted on foam squares. I embossed the bottom piece of cardstock with a Cuttlebug folder. The sentiment is from My Favorite Things and is embossed with detail silver embossing powder.
For this card, I used the "negative" portion of the sticker. I matted with silver shimmery paper. The bottom layer is a card part that I actually dug out of my trash bag! I had made it into a card a while ago, but didn't like the card, so I threw it out. Came across it while I was looking for something and decided this part was worth saving. So, I trimmed it down and matted it with silver, also. I had made the background by sponging cardstock with distress ink, then "stamping" with water spritzed on a background stamp. The sentiment is the same as the first card.

Thanks so much for stopping by, and I hope you'll come back and visit again soon!

Thursday, November 19, 2015

Embossing Paste Birthday

How about not-a-Christmas card for today:) Not sure why these papers were out on my table last week, but they were - sitting there looking kind of like this. So, I thought it was meant to be and this card was born.

The three patterns of paper (the stripes, the flowers, and the gray under the purple) are all from a matstack from Recollections. I used a brass stencil, embossing paste and microfine glitter for the sentiment. The butterfly was done with a Memory Box die. The sentiment panel is mounted on foam squares.

Thanks so much for stopping by, and I hope you'll come back and visit again soon!

Thursday, September 3, 2015

Glittery Birthday

This is made with a left-over part from tomorrow's card:) I was testing the stamp, color, etc. I did like it for my project, but stamped it again for that card. Then I used this piece to test the glitter, too. (I ended up not using glitter on tomorrow's card, though.) The image is from a Papertrey Ink set. I cut it out and mounted it on foam squares and matted with white. The glitter is microfine. The sentiment is also from Papertrey.

Thanks so much for stopping by, and I hope you'll come back and visit again soon!

Tuesday, August 18, 2015

Christmas Joy

 I have had this gold Christmas tree sticker for MANY years. I decided to finally use it. I still have several snowflakes that came on the same sheet. I don't know if it's Elizabeth Craft or not, but it's a similar sticker. Plus, I finally got some microfine glitter. How cool! I have done the technique with ultrafine, but it's just not the same:) The microfine is so soft.

I put double-sided sticky paper on a small piece of white cardstock. Then I removed the other side of the non-stick paper so that I had a sticky surface. That's where I carefully put the sticker. Then I put the microfine glitter over the entire piece. I colored carefully with my Copic markers. I sure wish you could see the wonderful sparkle! I matted with a scrap of gold that was already embossed with my Darice Wire Fence folder. I stamped the "joy" (from Papertrey Ink) with Versamark and embossed with detail gold embossing powder. The background was embossed on a piece of white cardstock with a Sizzix embossing folder.

I am linking this up to the Christmas Card Challenge blog. This week's optional challenge is a photo inspiration, but the real challenge is to make a Christmas card.

Thanks so much for stopping by, and I hope you'll come back and visit again soon!

Tuesday, April 14, 2015

Happy Birthday, Dad!


I had things to be done yesterday, but I took a break to spend some time in my stamping room. I decided to check out the challenges at SplitCoastStampers and chose to do the Technique Lovers' Challenge.

This week's challenge is "Negative Glitter." You die-cut an opening and add glitter underneath using double-sided tape and colored glitter. I used quarter-inch Scor-Tape on a white card base and put three strips of it across the card, positioned under where the opening would be. I removed the backing on one piece of tape and sprinkled the glitter on it. I cleaned off the excess glitter, removed the paper from the second piece of tape and added the second color of glitter. Then I repeated the process and added the third color of glitter. When I was in Omaha, I had used Sheri's die to cut this front panel from Papertrey Ink's Terra Cotta Tile cardstock, and it had been sitting on my table, waiting to be used. I finally had the perfect use for it! I stamped the loon (from Repeat Impressions) on the card front and then the sentiment (from Hero Arts.) It was lacking a little something, so I used a fine-tip marker to add the hand-doodles around the edges. Then I adhered the card front to the card base.

This card is for my dad, who will be 90 on Friday. We're having a party for him and I sure hope it's well-attended!

Thanks so much for stopping by, and I hope you'll come back and visit again soon!

Saturday, March 21, 2015

Glittery Birthday

I love sparkle, but don't use it as often as I would like.

I placed a sticker from Elizabeth Craft Design on a square of double sided sticky paper, then pressed glitter over it all. I used markers to color over the glitter. I matted with black. The sentiment is from Stampendous.

Thanks so much for stopping by, and I hope you'll come back and visit again soon!

Thursday, April 25, 2013

Black and White Wedding

How about a wedding card for today?

I used my Stampin' Up! set called Easy Events again. I stamped the image on a strip of white. I added a little bit of color to the leaves and the heart. I added some Star Dust Stickles to the wings and heart and tiny gems to the eyes. I used Scor-Tape to make glittery stripes on the sides with black glitter. I matted with shimmery black and used Dimensionals for added dimension.

Edited to add: It was suggested to me that I enter this in the Runway Inspired blog challenge, so I did! The challenge this week is an Inspiration challenge, based on this photo.

Thanks so much for stopping by, and I hope you'll come back and visit again soon!

Thursday, April 18, 2013

My First Christmas Card for 2013! - and some news, too

Finally I made a Christmas card for this year! Last year at this time I must have had about 20 of them finished. Oh well - I have time:) Some day I'll start on my calendars, too, but not today. If I start cranking out the Christmas cards, maybe I'll start up my "Christmas Sunday" again.

Anyway, back to this card. I've had this piece of textured off-white cardstock with the glittery strip on it in my "Card Parts" pile for quite a while. I'm pretty certain I used a piece of Scor-Tape and sprinkled it with red glitter. I finally decided to use it. The sentiment stamp and the mistletoe stamp are both from a set from Stampin' Up! called Christmas Blessings. I colored the leaves with a Memento marker and the berries with a white Tim Holtz marker. I matted with Real Red cardstock. This card is also for the Christmas Card Challenge blog. There is always a specific challenge, but the overall challenge is just to make a Christmas card.

An update on my mom. Her PET scan showed that the surgeon was not able to remove all of her cancer. She will be starting six weeks of radiation today. Any prayers for her would be greatly appreciated. Thanks!

And some great news - we will not only be getting a new grandson at the end of May - we'll be getting a new grandchild in October, too! Pretty exciting!

And this is in response to Celia's question on this card. Yes, I use Goo Gone as a substitute for Gamsol, which I do not have. I have heard that you can use baby oil, also, but I have never tried that.

Thanks so much for stopping by, and I hope you'll come back and visit again soon!

Sunday, June 24, 2012

"Christmas Sunday"

Here is the Christmas card I made this week. I'm submitting it to the Christmas Card Challenge blog. There is a theme, but the main point is to make a Christmas card. (Edited to add: the theme this week is to use rolled paper flowers.)


I believe this stamp is by Northwoods - I stamped it while at my Group Gathering. This card is a case of my friend, Georgia. I was finally putting away my Christmas cards and found the one she sent me last year. I already had the stamped image out, so I decided to add glitter all over the image, like Georgia did. I first colored the image with Copic markers. I ran it through my Xyron, then added ultrafine glitter to the entire panel. I matted with red, and mounted it on a white cardbase which I embossed with a Sizzix embossing folder.


Thanks so much for stopping by, and I hope you'll come back and visit again soon!

Monday, January 16, 2012

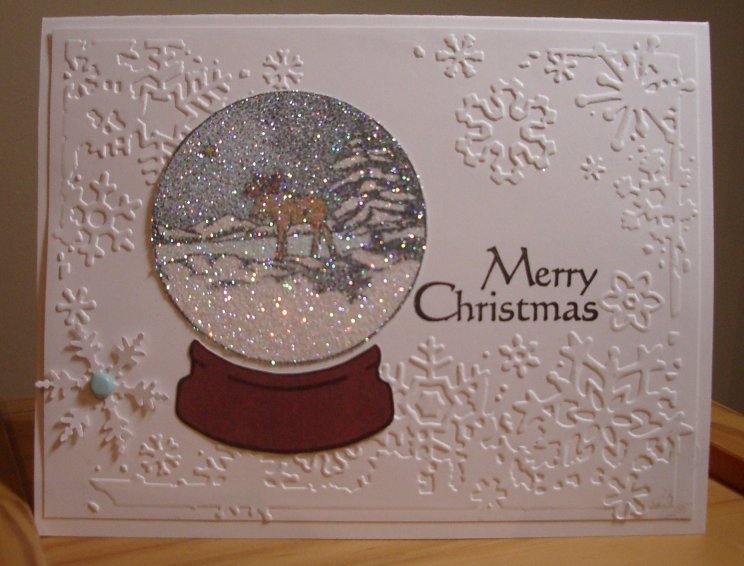
Repeat Impressions Stamp of the Week - Moose Snow Globe

Another Monday, another Repeat Impressions Stamp of the Week, available for 50% off through Sunday only. This week's stamp is called Moose Snow Globe and can be found here. A very cool stamp:) Please visit the Repeat Impressions blog, The House That Stamps Built, for all the details and to see what the other Rock Stars have created. Or follow these links to their blogs:
Cheri ~ Darsie ~ Dawn ~Joy ~ Vicki

I stamped my image with black Memento ink and colored with Copic markers. I stamped the base of the snowglobe on patterned paper and cut it out. I ran the snowglobe through my Xyron and sprinkled it with ultrafine glitter. I used a punch for the snowflake and added a light blue brad. The background was embossed with an embossing folder and the sentiment is from Repeat Impressions. While you're at the RI blog, be sure to check out the challenges, too. You have an opportunity to win some great prizes!


Thanks so much for stopping by, and I hope you'll come back and visit again soon!

Tuesday, January 3, 2012

Glitter, Glitter Everywhere!

I received a beautiful gift tag (and hand-made gift!) from our son-in-law's mother last year and always meant to try making a card like it. I didn't get it done in 2011. This year, I received the same gift tag (and another wonderful hand-made gift!) and decided I would try making one like it right away. Here is my attempt.


First, I stamped the image (from Gina K) on acetate with Staz-On black and colored the back of it with Copic markers. I cut it out with a Nestability. I cut the scalloped mat out of black and cut a hole in it. I cut a hole in the front of the card, too, then glued the mat on the card front and used my ATG gun to adhere the acetate to the inside of the card. For the glitter, I cut a rectangle from thin paper and ran it through my Xyron machine. I taped it to the inside back of the card and removed the backing. I sprinkled ultra-fine glitter over the entire piece. The sentiment is from Verve.


Thanks so much for stopping by, and I hope you'll come back and visit again soon!

Thursday, July 28, 2011

One More Glittery Sticker


This is the last of the stickers I made with the materials Harriet brought with her in June.  (You can see the other two here and here.)


I carefully cut the butterfly out and mounted it on white cardstock.  Then I matted with Stampin' Up!'s Perfect Plum and mounted the panel on Dimensionals.  I embossed the bottom piece with a Cuttlebug folder and added the sentiment from Papertrey Ink.


Thanks so much for stopping by, and I hope you'll come back and visit again soon!

Monday, November 29, 2010

Repeat Impressions Stamp of the Week - Joy (Times Four!)

Well, Monday has rolled around again.  I can't believe how quickly the weeks fly by!  Because it's Monday, it's time to reveal another Repeat Impressions Stamp of the Week.  This week's stamp is 2108-H, JOY.  You can view it on this page.  To find out how to purchase this stamp at 50% off, please visit the Repeat Impressions blog, The House That Stamps Built.  You will also find links to the other Rock Stars' creations there, too.  Or simply follow these links.
Dana ~ Harriet ~Julie ~ Maki ~ Robin

I have four cards to share with you today using this wonderful Joy stamp.  They are all very simple, of course!  For this first one, I stamped on white with black ink.  I also stamped on a light blue cardstock, colored the land areas of the world with a green marker, and cut out the "O."  I glued it on to the white and matted that piece with the same color blue cardstock.  I think this is my favorite of the four.
For this second one, I stamped with Versamark on blue cardstock and embossed with a clear, sparkly embossing powder.  I matted with white and used some old patterned paper by Fiskars for the background.

For this third one, I again stamped with Versamark on blue, but this time I embossed with white embossing powder.  I rounded the corners on both the blue layer and the white matting layer.  I tripled matted using red cardstock.  The card base is a pre-made one by Die Cuts With a View.  The punched snowflakes are mounted on little pieces of Dimensionals.
I once more used Versamark to stamp the image on this fourth card, and then used a white embossing powder with silver sparkles in it.  I matted with white again.  For the border, I used Scor-Tape on the card base and then sprinkled with Martha Stewart glitter.

Thanks so much for stopping by, and I hope you'll come back and visit again soon!