I made this card for Natasha's Clean and Simple Stamping Fall to Layout challenge #39, Take Two.
When a friend was over a couple weeks ago, I got out my Letterpress. I made the green-inked background using it. This is half of one of the two pieces that I made. I used gold shimmery cardstock for the matting and the strip across the bottom of the letterpressed piece. For the bottom tiny-scalloped edge, I used a decorative scissors! :) Anyone else have any of them left? I embossed the gold strip with a Cuttlebug border folder. The sentiment is embossed with detail gold embossing powder, and is from Papertrey.
Thanks so much for stopping by, and I hope you'll come back and visit again soon!
A place for me to share the cards I create, and maybe a few other things, too!
Monday, October 23, 2017
Thursday, October 19, 2017
Joy and Wonder
When I got new dies, I generally used them right away to test them out. Then I eventually use those pieces that I've cut. This is one of the die-cuts that has been sitting on my table for a while. I cut it out of green foil cardstock. Hard to tell in the picture, but the bottom layer is gold shimmery cardstock. I used Versamark ink and detail gold embossing powder for the sentiment, which is from Papertrey.
Thanks so much for stopping by, and I hope you'll come back and visit again soon!
Tuesday, October 17, 2017
Thank You
The card base is ivory. I had a terrible time trying to get the pale stripes to show up on the right, and this was the best I could do. The card opens from the left side. The card front is cut off one inch from the right edge. I added a piece of Washi tape along the edge of the right side of the card front. The pale-striped patterned paper is actually on the inside of the card. The sentiment is from a Stampin' Up! set and is stamped with a bluish gray ink. The sentiment was cut and embossed with a Memory Box stitched rectangle die.Thanks so much for stopping by, and I hope you'll come back and visit again soon!
Labels:
DIe Cuts With a View,
Stampin' Up!,
Thank You,
Washi Tape
Sunday, October 15, 2017
Fall to Layout #38, Take Two
This card is for the Clean and Simple Stamping blog's challenge, Fall to Layout #38, Take Two.
The patterned papers are from an old Die Cuts With a View matstack called "Linen Closet." I've had it for many years. (It's hard to tell, but the sentiment piece is patterned, also.) I matted the two layers with coordinating brown cardstock. I added three pearls for the butterfly's body, which was punched with a Martha Stewart punch. The card base is ivory.
Thanks so much for stopping by, and I hope you'll come back and visit again soon!
The patterned papers are from an old Die Cuts With a View matstack called "Linen Closet." I've had it for many years. (It's hard to tell, but the sentiment piece is patterned, also.) I matted the two layers with coordinating brown cardstock. I added three pearls for the butterfly's body, which was punched with a Martha Stewart punch. The card base is ivory.
Thanks so much for stopping by, and I hope you'll come back and visit again soon!
Saturday, October 14, 2017
Repeat Impressions Tic-Tac-Toe Challenge
I created this card for the Repeat Impression's challenge. The challenge is to choose three items from a Tic-Tac-Toe board. I chose the line across the middle: patterned paper, Washi tape, and black and white. Sorry I did not use a Repeat Impressions stamp on this card. (I did, however, use all RI stamps on the Halloween cards for the grandkids. :-) )
The sentiment is a die-cut. The bottom patterned paper is from The Paper Studio. I used Washi tape across the top of the patterned paper. Tic-tac-toe! :)
Thanks so much for stopping by, and I hope you'll come back and visit again soon!
The sentiment is a die-cut. The bottom patterned paper is from The Paper Studio. I used Washi tape across the top of the patterned paper. Tic-tac-toe! :)
Thanks so much for stopping by, and I hope you'll come back and visit again soon!
Labels:
Birthday,
Dies,
Repeat Impressions,
The Paper Studio,
Washi Tape
Wednesday, October 11, 2017
Rubbernecker Stamp - Times Three
I used the same Rubbernecker stamp on these three cards, and also the same markers to color it. Not a big difference between the three, but you get them all here, anyway:)
For this first one, I just stamped the image on ivory cardstock after coloring with markers. I matted it with blue cardstock. I embossed the image with a Darice Wire Fence folder. The sentiment was cut with a die three times and layered for dimension.
This was the second stamping of the image after spritzing the colored image with water. I matted with olive cardstock and cut the "hello" out of the same cardstock. It is layered, also. (I ended up not using the first stamping.)
This image was spritzed, also, and stamped on watercolor cardstock. I used the same Darice folder to emboss it. I used a metallic pen to draw the border around the edge. The sentiment is from a Stampin' Up! set. I cut it and the matting with Nestabilities. I colored the scallops with the same metallic pen.
Thanks so much for stopping by, and I hope you'll come back and visit again soon!
Labels:
Birthday,
Darice,
Dies,
Martha Stewart,
Nestabilities,
Rubbernecker,
Stampin' Up!
Tuesday, October 10, 2017
Fall-To Layout #37 Take Two
I made this based on Natasha's Fall-To Layout #37 Take Two.
The patterned paper is from another pack of paper that I got from our daughter-in-law's trip to Japan. So pretty. I matted it with pink - with the bottom edge punched with an EK Success punch. Then I matted that with black. The sentiment is from Papertrey Ink and is matted with black and mounted on foam squares. I added a glittery flower with a pale pink brad in the center.
Thanks so much for stopping by, and I hope you'll come back and visit again soon!
The patterned paper is from another pack of paper that I got from our daughter-in-law's trip to Japan. So pretty. I matted it with pink - with the bottom edge punched with an EK Success punch. Then I matted that with black. The sentiment is from Papertrey Ink and is matted with black and mounted on foam squares. I added a glittery flower with a pale pink brad in the center.
Thanks so much for stopping by, and I hope you'll come back and visit again soon!
Saturday, October 7, 2017
Season's Greetings
Another new die, and an older one. The new one is the scenery. The older one is the sentiment. I am quite certain, but not positive, that the sentiment is from Impression Obsession. I cut both die cuts out of silver foil cardstock. (I know - it looks more black than silver, but it truly is silver.) The background was done by rubbing the cardstock with a Stampin' Up! ink pad. I made sure to cover the bottom with ink. Another Christmas card done. I think I will make multiples of this card, but perhaps with a solid color background, rather than the inked-up one.
Thanks so much for stopping by, and I hope you'll come back and visit again soon!
Friday, October 6, 2017
Another Butterfly Birthday
Along with cheap dies, I ordered some really cheap ink. I won't do that again:) (It was, I believe, 85 cents for a multi-color ink pad. I ordered two. You may or may not see the other color, which I used in this same way.)
I rubbed the ink pad directly to the paper, then I sponged a little extra on to make sure to cover. The butterflies were done with a new die, as was the sentiment. I matted with black. Easy peasy:) I mounted the layer on foam squares.
Thanks so much for stopping by, and I hope you'll come back and visit again soon!
I rubbed the ink pad directly to the paper, then I sponged a little extra on to make sure to cover. The butterflies were done with a new die, as was the sentiment. I matted with black. Easy peasy:) I mounted the layer on foam squares.
Thanks so much for stopping by, and I hope you'll come back and visit again soon!
Thursday, October 5, 2017
Flowery Thank You
Our daughter-in-law just spent a week in Japan for work. Luckily for us, it coincided with part of the time that we needed to be out of our house. We were able to give our son a hand with the boys while their mom was gone. Worked out great for everyone:)
She brought me back some beautiful papers from Japan. I thought I would make her a thank you card using some of my favorite. I simply used it for background, matting it with some Papertrey Ink cardstock I've had for years. I mounted the smaller layer on foam squares. The sentiment was die cut. I cut it three times and layered them. I also added some Diamond Glaze over the top for an extra decorative touch.
Thanks so much for stopping by, and I hope you'll come back and visit again soon!
She brought me back some beautiful papers from Japan. I thought I would make her a thank you card using some of my favorite. I simply used it for background, matting it with some Papertrey Ink cardstock I've had for years. I mounted the smaller layer on foam squares. The sentiment was die cut. I cut it three times and layered them. I also added some Diamond Glaze over the top for an extra decorative touch.
Thanks so much for stopping by, and I hope you'll come back and visit again soon!
Wednesday, October 4, 2017
Die-Cut Foil Flowers
Another new die, so I'm linking up to Darnell's NBUS Challenge #12 again (Never Before Used Schtuff.)
I used the die to cut out of white and three colors of foil. I added the colored pieces to the white. It's kind of hard to see the shine in the picture. I matted with green foil. The sentiment is from Papertrey Ink.
Thanks so much for stopping by, and I hope you'll come back and visit again soon!
I used the die to cut out of white and three colors of foil. I added the colored pieces to the white. It's kind of hard to see the shine in the picture. I matted with green foil. The sentiment is from Papertrey Ink.Thanks so much for stopping by, and I hope you'll come back and visit again soon!
Tuesday, October 3, 2017
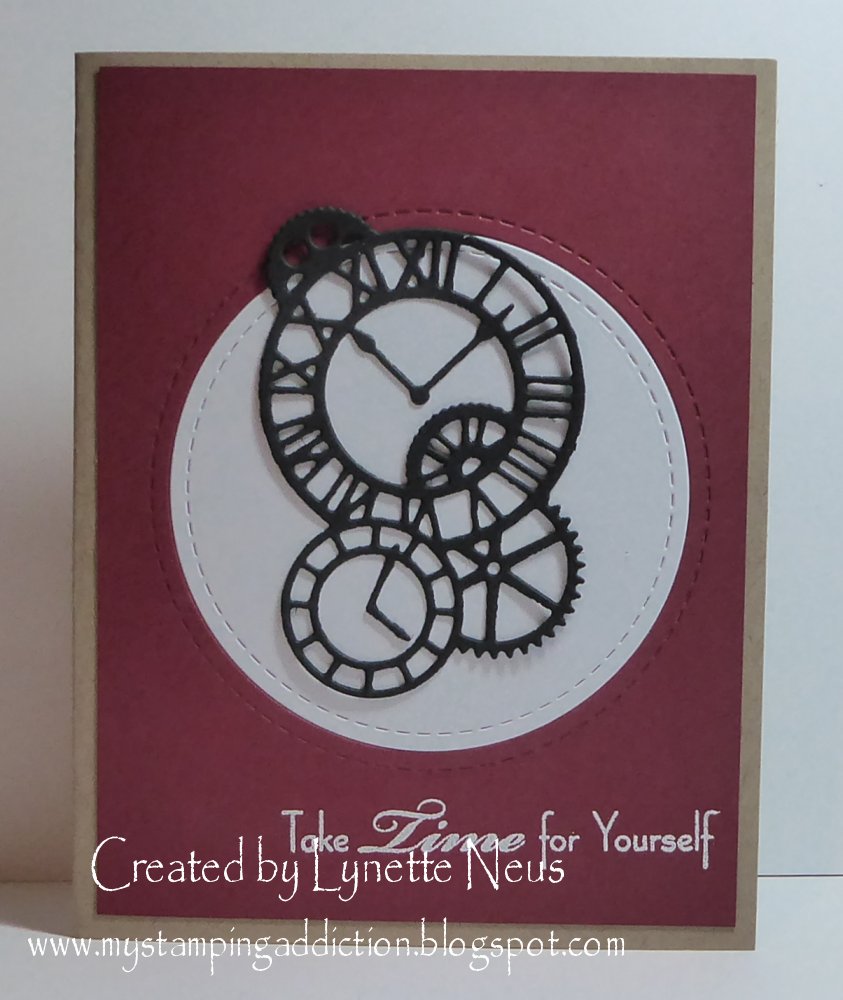
Time
Another card for Darnell's NBUS challenge #12 (Never Before Used Schtuff.) The new items are dies again - the clock with gears and the stitched circles.
I love this time piece. I thought it would go well with kraft and red. I cut the circles with my new stitched circle dies out of red and white. I didn't know what sentiment I should use, because it just didn't seem quite right for a birthday, which is what I usually make. I remembered that I had a "Time" set from My Favorite Things. That worked. I stamped it with Versamark and embossed with detail white powder.
Thanks so much for stopping by, and I hope you'll come back and visit again soon!
I love this time piece. I thought it would go well with kraft and red. I cut the circles with my new stitched circle dies out of red and white. I didn't know what sentiment I should use, because it just didn't seem quite right for a birthday, which is what I usually make. I remembered that I had a "Time" set from My Favorite Things. That worked. I stamped it with Versamark and embossed with detail white powder.Thanks so much for stopping by, and I hope you'll come back and visit again soon!
Monday, October 2, 2017
Fall-To Layout 36 - Take Two
I made this card for Natasha's Fall-to Layout #36, Take Two. I'm also entering it into Darnell's NBUS challenge #12 (Never Before Used Schtuff.) The new items are all dies - the teddy bear, the stitched circle, and the "holey" circles. (I see when I was linking up the blog post that I got the sketch a tad wrong, but I think it will be fine.)
It was so great to be back into my stamping room! A few new dies were delivered while we were staying at our son's house. I finally got a chance to use them. I cut the teddy bear out of kraft. I tried brayering a light brown onto the raised areas, but I got ink in the depressed areas, too. So, I just sponged more ink over the whole thing. I added black "nail heads" to his eyes. (Gosh, that sounds painful! I swear I did it gently.) I had cut the circle out of red with my new stitched circle dies. Then I used the die with holes to die cut inside the stitched circle. I added the teddy bear to the circle and mounted the circle on foam squares. The sentiment is from Papertrey Ink. The patterned paper is very, very old. I matted both layers with black.
Thanks so much for stopping by, and I hope you'll come back and visit again soon!
It was so great to be back into my stamping room! A few new dies were delivered while we were staying at our son's house. I finally got a chance to use them. I cut the teddy bear out of kraft. I tried brayering a light brown onto the raised areas, but I got ink in the depressed areas, too. So, I just sponged more ink over the whole thing. I added black "nail heads" to his eyes. (Gosh, that sounds painful! I swear I did it gently.) I had cut the circle out of red with my new stitched circle dies. Then I used the die with holes to die cut inside the stitched circle. I added the teddy bear to the circle and mounted the circle on foam squares. The sentiment is from Papertrey Ink. The patterned paper is very, very old. I matted both layers with black.Thanks so much for stopping by, and I hope you'll come back and visit again soon!
Sunday, October 1, 2017
October Calendar Page
Here is my October calendar page - pretty simple:) The ghost, bat and sentiment are from a Recollections set. The matting paper is also from Recollections.
Update on what's going on at our house - the short version. We just had our kitchen and entryway hardwood floors refinished. We also added some more wood. We replaced carpet to add a hallway and also put wood in our dining room. The old and new wood were not the same color after staining and they had to sand down the floors again and restain. We were out of our house for nearly two weeks, and this was after camping for three days. Luckily, we were able to spend that time at our son and daughter-in-law's house with them. That was awesome! The plan was to just clean up and re-install the baseboards. Well, that didn't work, since some areas were different. (There were no longer any areas where carpet met wood, etc.) The baseboard was not in great shape anyway. So, we had to buy all new baseboard and quarter-round and stain and finish it. Our installer was awesome and agreed to help install it. He and his sons came on Thursday and got that done. They also helped move our very heavy hutch. It's so great to have that much done!! Our house has been in a state of upheaval for over two months, between having the cabinets refinished, painting my stamping room, painting the kitchen and now the floors. We have one more thing, but that will be a piece of cake. We have to decide which carpet we want and re-carpet our living room and stairs. Then we'll be done for a while. (A long while!)
Thanks so much for stopping by, and I hope you'll come back and visit again soon!
Update on what's going on at our house - the short version. We just had our kitchen and entryway hardwood floors refinished. We also added some more wood. We replaced carpet to add a hallway and also put wood in our dining room. The old and new wood were not the same color after staining and they had to sand down the floors again and restain. We were out of our house for nearly two weeks, and this was after camping for three days. Luckily, we were able to spend that time at our son and daughter-in-law's house with them. That was awesome! The plan was to just clean up and re-install the baseboards. Well, that didn't work, since some areas were different. (There were no longer any areas where carpet met wood, etc.) The baseboard was not in great shape anyway. So, we had to buy all new baseboard and quarter-round and stain and finish it. Our installer was awesome and agreed to help install it. He and his sons came on Thursday and got that done. They also helped move our very heavy hutch. It's so great to have that much done!! Our house has been in a state of upheaval for over two months, between having the cabinets refinished, painting my stamping room, painting the kitchen and now the floors. We have one more thing, but that will be a piece of cake. We have to decide which carpet we want and re-carpet our living room and stairs. Then we'll be done for a while. (A long while!)
Thanks so much for stopping by, and I hope you'll come back and visit again soon!
Thursday, September 14, 2017
Happy Birthday, Annie!
I've had this card base sitting around my stamping room for years! It's finally been made into a card. Yippee! It has hopefully reached my stamping friend, Annie, in Canada by now. Happy Birthday, Annie!
I stamped the bottom border with a Stampin' Up! stamp a long time ago, and then cut carefully around it. (So, the front of the card ends at the bottom of the "lace.") The roses and the sentiment were cut with two of my new dies. I cut out them of white cardstock and colored them with Copic markers. I mounted the leaves on foam squares and glued the rest down. I cut a couple extra layers of the sentiment and glued them all together for added dimension.
Thanks so much for stopping by, and I hope you'll come back and visit again soon!
I stamped the bottom border with a Stampin' Up! stamp a long time ago, and then cut carefully around it. (So, the front of the card ends at the bottom of the "lace.") The roses and the sentiment were cut with two of my new dies. I cut out them of white cardstock and colored them with Copic markers. I mounted the leaves on foam squares and glued the rest down. I cut a couple extra layers of the sentiment and glued them all together for added dimension.
Thanks so much for stopping by, and I hope you'll come back and visit again soon!
Wednesday, September 13, 2017
Happy Anniversary, Harriet and Bruce!
Today is my friend Harriet's anniversary. Happy Anniversary, Harriet and Bruce!
This is another of my new dies. The card is 3 1/2 x 6 3/8 inches. The patterned paper is from Recollections. The sentiment is an old PSX stamp. I mounted the sentiment panel on foam squares.
Edited to add: I would love to email you, Shirley, but I have no way of communicating with you. You are welcome to send me an email. My address is in the "View my complete profile" on the top right side of my blog under the "About Me" section. PS - I ordered this die from eBay.
Thanks so much for stopping by, and I hope you'll come back and visit again soon!
This is another of my new dies. The card is 3 1/2 x 6 3/8 inches. The patterned paper is from Recollections. The sentiment is an old PSX stamp. I mounted the sentiment panel on foam squares.
Edited to add: I would love to email you, Shirley, but I have no way of communicating with you. You are welcome to send me an email. My address is in the "View my complete profile" on the top right side of my blog under the "About Me" section. PS - I ordered this die from eBay.
Thanks so much for stopping by, and I hope you'll come back and visit again soon!
Monday, September 11, 2017
Happy Birthday, Vicki!
Today is my friend Vicki's birthday. Happy Birthday, Vicki! Here is the card that I made for her. The butterflies and the sentiment are both dies. I added a couple "pearls" to the flower centers. The background paper is from Recollections.
Thanks so much for stopping by, and I hope you'll come back and visit again soon!
Thursday, September 7, 2017
Simple Birthday Card - With a Twist! :)
A couple months ago, a friend showed me a card she had made. It's called a "Pop and Twist" card. I thought it was pretty cool and wanted to make one. Last weekend was the time for me to try:) I knew that the hardest part for me would be trying to figure out how to decorate so many spaces! So, I went totally clean and simple. I only took these two pictures, but if you search for instructions, you will see how it works and can find different ways of making it. It looks like a "regular" card from the front, but when you open it, the middle part twists and pops out. Pretty cool!
I used a couple more of my new dies. I layered the "Happy Birthday" with about four pieces. The sentiment stamps are from a Hampton Arts set.
Thanks so much for stopping by, and I hope you'll come back and visit again soon!
I used a couple more of my new dies. I layered the "Happy Birthday" with about four pieces. The sentiment stamps are from a Hampton Arts set.
Thanks so much for stopping by, and I hope you'll come back and visit again soon!
Tuesday, September 5, 2017
Silver Butterflies
Another card using one of my newer dies. I cut it out of silver "mirror" cardstock. The card base is a tri-fold card with the circle already cut out of it. I purchased them at our Group Gathering a few years ago. I embossed the front with an Anna Griffin embossing folder called "Matelasse." I cut a piece of blue vellum for the window. Before adding it, I embossed it with a Darice embossing folder called "WIre Fence." I cut the sentiment out of the silver cardstock, too, and added another layer under it for more dimension.
I had a visitor leave me a comment about the size of my matting and wondering how I did it. (Not on this card, though.) I cut my matting pieces 1/8 inch bigger than my image pieces. That gives me a 1/16 inch border. Not always, but usually. I use a Tonic guillotine cutter that I've had for many years. I love it! This is what it looks like. I did not get mine at Amazon, and I'm sure it's available many, many other places. It's just the easiest for me to link to quickly.
Thanks so much for stopping by, and I hope you'll come back and visit again soon!
I had a visitor leave me a comment about the size of my matting and wondering how I did it. (Not on this card, though.) I cut my matting pieces 1/8 inch bigger than my image pieces. That gives me a 1/16 inch border. Not always, but usually. I use a Tonic guillotine cutter that I've had for many years. I love it! This is what it looks like. I did not get mine at Amazon, and I'm sure it's available many, many other places. It's just the easiest for me to link to quickly.
Thanks so much for stopping by, and I hope you'll come back and visit again soon!
Monday, September 4, 2017
Fall-To Layout #32 Take Two
I used another portion of this fall-patterned paper. (One quarter left, and I actually used it for another card that I made yesterday. You'll be seeing that one soon, or I might just save it for a month or so.) I think this paper is so pretty, and I don't even know where it came from. The die is one of my newer ones. I cut the ovals using Nestabilities. I mounted the ovals on foam squares.
Thanks so much for stopping by, and I hope you'll come back and visit again soon!
Subscribe to:
Posts (Atom)


