My card for today is for the Limited Supplies Challenge #187on SplitCoastStampers. Today’s challenge is to make a Christmas card with a “critter” and no embellishments other than ribbon. Oops, maybe I wasn’t allowed to use glitter!
My main image is two polar bears from the retired Stampin’ Up! set Polar Bears. The sentiment is from the same set, stamped in Pacific Point. I used Versafine Black Onyx to stamp the image on Whisper White, and I also stamped it on Kiwi Kiss and Pacific Point. I embossed with detail black embossing powder. I cut out the scarves from the Kiwi Kiss and Pacific Point and glued them on the bears. The circle is cut and embossed with Nestabilities and the scalloped circle is also Nestabilities. The “snow” is from JoAnn’s, and it’s just called “glitter” and “Crystal. It’s quite coarse and not too sparkly, so I added a tiny sprinkle of silver glitter to it. I embossed the bottom of the card with a Cuttlebug Snowflake folder and scored a couple lines above it with my trusty Scor-Pal. The image panel is popped up on dimensional squares.
Thanks so much for looking, and I hope you’ll come back and visit again soon!
A place for me to share the cards I create, and maybe a few other things, too!
Friday, September 26, 2008
Thursday, September 25, 2008
Thinking of You
Today’s card can’t get any simpler! Seems like I’m always running short on time.
The circles are embossed with small Cuttlebug folders. The scoring is done with my Scor-Pal. The flower stamps are from PaperTrey Ink Beautiful Blooms, and the sentiment is from Inkadinkado. I added a couple pearls from Target’s Dollar Spot.
Thanks so much for looking, and I hope you’ll come back and visit again soon!
Wednesday, September 24, 2008
For Cammie's Alzheimer's Challenge
Today’s card is the one that I made for Cammie’s Alzheimer’s blog candy. I will mail it to the home where her grandmother was living in Pennsylvania. It’s also for yesterday’s SplitCoastStampers (SCS) Color Challenge (using Very Vanilla, Kiwi Kiss and Baja Breeze) and today’s SCS Sketch Challenge.
The card base is Very Vanilla, as are all the textured pieces and the sentiment. I embossed the two bottom pieces with a Cuttlebug Argyle folder which I had brayered with color. The top layer I stamped with leaves from a Fiskars Thank You clear set, and then embossed it with a Dotted Swiss folder. The sentiment is also from the same Fiskars set. I sponged color on the edges of all of the pieces, as well as the sentiment and the edges of the card base. The sentiment is cut and embossed with a Long Oval Nestability and mounted on a scalloped piece cut with the Scalloped Long Oval Nestabilities set. A couple brads and some Pop Dots complete the card.
Thanks so much for looking, and I hope you’ll come back and visit again soon!
Tuesday, September 23, 2008
Cammie and Alzheimer's
My post today is not my “normal” post. It’s about Cammie (Carolyn King) and what she has done and is doing. Here is a link to her blog: “My Blog” by Cammie. She is an artist and designs stamps for Gina K, and is a VERY talented cardmaker. (I love her style!) Her grandmother died of Alzheimer’s in June, and she has very generously donated ALL of her proceeds from her stamp set Whimsical Autumn to the Alzheimer’s Association. She has also received over $1000 in donations which will be awarded to ONE lucky person! Here is a link to the specific post. I hope you all take the time to make a card for an Alzheimer's patient's care giver. Good luck!
Monday, September 22, 2008
Sympathy on the Loss of a Dear Pet
Finally, another card! Man, stamping time has been hard to come by lately.
This card was made for a good friend who recently had to have her cat put to sleep due to cancer. Poor kitty, and poor Joanne.
I only had about ten minutes Friday morning before a doctor’s appointment, but I had pretty much “designed” this card in my head, so it went quickly. I used an Argyle embossing folder by Cuttlebug for the embossed background. Before I ran it through my BIGkick, I brayered Stampin’ Up!’s Going Gray on the folder. I dry embossed the cat and cut it out with Nestabilities – the matting, too, which is Going Gray. I stamped the sentiment and also cut it out with Nestabilities. The sentiment is from a clear set by Inkadinkado. It, and the argyle, are both mounted on Going Gray. I sponged the edges with Going Gray, also.
I think I’m done with work for the day, and it’s time to play. Yippee!! Thanks so much for looking, and I hope you’ll come back and visit again soon!
Friday, September 19, 2008
Camping in Late September
Hello, and thanks for stopping by! We decided to take advantage of the BEAUTIFUL weekend, and we're going camping. Spur-of-the-moment works for me! So, I'll be back in town on Sunday, but probably won't post til Monday. I hope you all have a wonderful weekend, too.
Come back and visit again soon!
Thursday, September 18, 2008
Birthday Flowers
It’s nice to stamp again! I finally got a chance for the first time since Sunday. We’ve been kind of busy – buying and selling a car and working on re-doing our den. But the car situation is all done, and the den is moving along quite nicely.
The image on this card is a stamp by Rubber Stampede. I stamped it with Versafine Black Onyx ink and colored it with Stampin’ Up! markers – Soft Subtles. (Except for the gray shadow – it’s not SU! and I’m too lazy to go back downstairs and see who makes it!) I punched it out with a Marvy Uchida circle punch, and the scalloped circle – Mauve Mist – is also done with a Marvy punch. I printed out the “happy birthday” on the computer. (I did printed ten cards today the same way – four “happy birthday”, four “thank you” and two “happy anniversary.” They make such great simple cards.) I scored the lines with my Scor-Pal and added some Stampin’ Up! Old Olive grosgrain ribbon. I pierced the scallops, added some hand-doodling around the edge of the image circle, and popped the image layer up with dimensional squares.
I hope to stamp again soon, but I do really want to get our den done – pillows made, valance made, paint, etc. – so I’m not sure when I’ll post again.
Thanks so much for looking, and I hope you’ll come back and visit again soon!
I hope to stamp again soon, but I do really want to get our den done – pillows made, valance made, paint, etc. – so I’m not sure when I’ll post again.
Thanks so much for looking, and I hope you’ll come back and visit again soon!
Tuesday, September 16, 2008
Another Simple Birthday
The choice today was no card, or this card. I choose “this card.” It’s an extremely simple card, but I still like it.
The card base is Stampin’ Up! Very Vanilla. The matting is SU! Certainly Celery. For the image, I used a fairly thin textured paper that came with a “raggedy” edge. I stamped the flowers from SU!’s Best Blossoms with Tangerine Tango, then masked them and stamped the leaves over them with Certainly Celery. I used a Stamp-a-ma-jig to get the placement of the sentiment (by All-Night Media – can you tell it’s one of my favorite birthday sentiments?) where I wanted it. The thin green strip across the bottom is layered on top of the stamped piece. I scored a couple lines on the top of the image panel with my Scor-Pal. I also scored a line above and below the image, and two lines to the right of it.
Thanks so much for looking, and I hope you’ll come back and visit again soon!
Monday, September 15, 2008
Simple Christmas Cards
These cards were made for a friend who asked me if I would make her Christmas cards this year. I told her they had to be simple or they would be too expensive! So, these are the ones I came up with.
They are all pretty much self-explanatory. From left to right: The first one is done by cutting a piece of cardstock a sixteenth inch shorter than the card front on each side, then scoring it at 2 ¾ inch, then folding it. Keeping it folded, put it in a Cuttlebug Snowflake folder with the folded edge sticking out about a quarter inch. After it’s embossed, re-score the folded line and score at the edges of the embossing. I sponged the edges in Baroque Burgundy, stamped the sentiment, added some ribbon, put some Crystal Stickles on some of the snowflake centers, and adhered it to the card front.
The second one is run through twice using a Cuttlebug Dotted Swiss folder – once on each side. Then I used a small circle Cuttlebug folder in the middle. After embossing the circle, I used an embossing stylus to push the dots out that got crushed with the small folder. Using a Stamp-a-ma-jig, I stamped the sentiment and the tree. I used my Scor-Pal to score lines beside the Dotted Swiss, but you really can't see that in the picture. I sponged the edges and adhered it to the card front.
The embossing on the third card is done right on the card front. I punched the plain circle and the scalloped circle (Bordering Blue) with Marvy Uchida punches. I used a white gel pen for the dots on the scallops. I used the Stamp-a-ma-jig to stamp the house – from Stampin’ Up’s Winter Wonderland retired set, and added eyelets. The sentiment is stamped with Versafine Black Onyx ink and has sponged edges. The circle and sentiment are both popped up with dimensional squares.
Whew! Takes longer to write about them than to make them! LOL!
Thanks so much for looking, and I hope you’ll come back and visit again soon!
Sunday, September 14, 2008
Birthday Butterflies
This card is for my next-door neighbor, who is also a great friend – and she loves purple.
I had out some Almost Amethyst cardstock and this stamp, and they went together just fine! The stamp is by Good Impressions. I stamped it with Versafine Black Onyx. It’s colored with Stampin’ Up! markers in Almost Amethyst and Certainly Celery. I also used a white gel pen near the leaves and on the butterflies. Surprise – the background is embossed with a Dotted Swiss Cuttlebug folder. LOL! The sentiment is by All-Night Media, stamped with Almost Amethyst ink. It was cut out with oval Nestabilities and embellished with black brads and black dots on the scallops with a gel pen. I sponged the edges of the CB’ed panel and the sentiment with AA ink, also. When everything was all put together – with the sentiment panel up on Pop Dots – I used Crystal Stickles on the butterflies for a little “glitz.”
Thanks so much for looking, and I hope you’ll come back and visit again soon!
Friday, September 12, 2008
Tangerine Birthday
I’m just going to take a second to thank everyone for visiting my blog – it’s great to have you here! I hope you come back again soon!
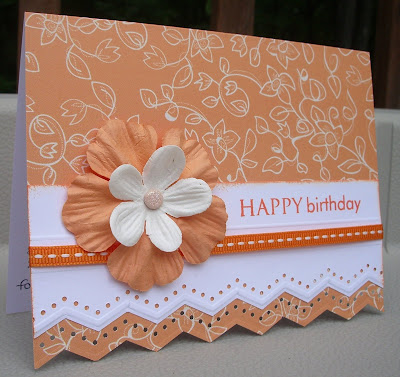
Today’s card is a pretty simple one. I’d say “for a change” but they are all simple! LOL! The card base is from Lasting Impressions. The white border is punched with a Martha Stewart punch, as is the bottom of the card. The white border is also scored with my Scor-Pal. The ribbon is from Amuse. I stamped the sentiment, which is from Papertrey Ink’s Paper Tray, with Tangerine Tango – a new “In Color” from Stampin’ Up! The flowers are Primas (I believe) that I got from Kim Hughes. The center of the flower is a sparkly brad – you just can’t see the glitz in the photo. I also sponged some Tangerine Tango around the sides and top of the white panel.
That’s it! Thanks again for stopping by.
Labels:
Lasting Impressions,
Martha Stewart,
Papertrey,
Scor-Pal
Thursday, September 11, 2008
Happy Anniversary, Harriet!
There wasn’t going to be a post today, but since my friend, Harriet, and her husband received their anniversary card in the mail today, I can post this one!
The entire card front is covered with vellum. I inked up the birds and the leaves (from Inkadinkado’s Birds Galore) with Versamagic Chalk Inks in Plumeria and Spanish Olive and stamped them on the vellum. Then I very patiently waited for them to dry. When they were totally dry, I flipped the vellum over and repeated the process on the other side. Even “in real life” it’s kind of hard to tell that they are stamped on the front and the back. (At least I think so!) I used a Cuttlebug border to emboss the green (Old Olive) strip, and then colored it with SU! markers in Baroque Burgundy and Old Olive and a white gel pen. I used my Scor-Pal and scored lines on each side of the Old Olive and adhered the strip to the card front, under the vellum. I used Duck Tape double-sided tape (available at JoAnn’s, among other places, I assume) to adhere the vellum to the card front and to the Old Olive. I also adhered the vellum to the upper corners, and then added the pearls. The sentiment is from a clear Fiskars wedding/anniversary set, and it’s stamped with Versafine Black Onyx and embossed with clear embossing powder. The card base is Papertrey Stamper’s Select White.
Thanks so much for looking, and I hope you’ll come back and visit again soon!
Labels:
Cuttlebug Folder,
Fiskars stamps,
Inkadinkado,
Vellum
Wednesday, September 10, 2008
Baby Cards
Last week, a friend asked me if I would make her a couple baby cards – how fun! These are the cards I came up with. I’ll show them both, even though they are really the same card.
The paper for both is from Die Cuts With a View – Nana’s Nursery. The boy card uses paper from the boy stack, and the girl one is from the girl stack. I used my Dotted Swiss Cuttlebug folder for the bottom panel, and then sanded it down a little bit. I used Nestabilities for them both – plain and scalloped. The ribbon on the girl’s is from PaperTrey. They both have brads for a little extra detail. The stamps are from Studio G. How’s that for short and sweet?
Thanks so much for looking, and I hope you’ll come back and visit again soon!
The paper for both is from Die Cuts With a View – Nana’s Nursery. The boy card uses paper from the boy stack, and the girl one is from the girl stack. I used my Dotted Swiss Cuttlebug folder for the bottom panel, and then sanded it down a little bit. I used Nestabilities for them both – plain and scalloped. The ribbon on the girl’s is from PaperTrey. They both have brads for a little extra detail. The stamps are from Studio G. How’s that for short and sweet?
Thanks so much for looking, and I hope you’ll come back and visit again soon!
Monday, September 8, 2008
Birds Galore Birthday Wishes
Today’s card is another one using Inkadinkado’s Birds Galore and Stampin’ Up!’s Sincere Salutations.
The bird image is inked with Versamagic Chalk Inks in Plumeria and Spanish Olive. I stamped it on scratch paper, and then on the card front. The rectangles are all cut with Rectangle Nestabilities – two scallops and one plain. The bottom layer is embossed with a Cuttlebug Dotted Swiss folder and sponged VERY lightly with Plumeria. The second layer is sponged with Spanish Olive. The top layer is embossed with a Cuttlebug Textile folder and sponged with Plumeria, and has a sheer ribbon tied around it. “Birthday Wishes” is stamped with Plumeria and embossed with Clear Embossing Powder.
Camping update: It rained. No surprise! We had a wonderful time anyway – getting together with friends is always nice, no matter what the weather.
Thanks so much for looking, and I hope you’ll come back and visit again soon!
Saturday, September 6, 2008
Birthday Wishes
Pre-posting is really nice! When this gets posted, I’ll be camping with a group of friends – and freezing! Oh well, it will be a lot of fun, and I’ll survive the cold. We always camp this weekend with this group of friends and the weather is totally unpredictable, ranging from really hot to really cold. One thing that is a constant, though, is that it always does some raining on us – LOL!
Anyway, today’s card is a birthday card. I started with the rose. I made it to use as the “R” in my Yahoo group’s Alphabet Swap, but changed my mind, so it was just laying on my table waiting to be used. I inked up a clear stamp by Penny Black using Versa Magic chalk inks – two shades of green, a pink and a burgundy. Then I carefully cut it out. It’s mounted on Pop Dots. “Birthday wishes” is from Stampin’ Up!’s Sincere Salutations, stamped in Eggplant Envy. It’s cut and embossed with a square Nestability, as is the Certainly Celery it’s matted on. The frame around it is also embossed with a square Nestability. The scoring is all done with my Scor-Pal. The cardstock is Stamper’s Select White from PaperTrey Ink.
Thanks so much for looking, and I hope you’ll come back and visit again soon!
Friday, September 5, 2008
Special Day Anniversary
This card could be used for many occasions, but I think it will probably be for my brother and sister-in-law’s anniversary. Kind of masculine, but still feminine enough. Don’t you think?
The image is from Birds Galore by Inkadinkado. I used Versamagic pads to color it. I misted the stamp after I used the ink on it, and then stamped it on watercolor paper. The green border is Certainly Celery and I cut it by using square Nestabilities. It is mounted on top of the watercolor paper, then it’s all mounted on black. The sentiment stamp is a clear one I’ve had for a couple years, but I can’t tell you who makes it – sorry!
Thanks so much for looking, and I hope you’ll come back and visit again soon!
Thursday, September 4, 2008
Pink Anniversary
This is a card I made last month, but couldn’t post it because it went to someone who reads my blog. So, today is as good day as any to add it.
The flowers and swirls are from a clear set by Heidi Grace, stamped with Versafine Black Onyx ink. I colored the flowers and added pearls for the centers. The lacy bottom is punched with a Martha Stewart punch. The matting is Pink Pirouette – one of the new “In Colors” from Stampin’ Up! for this year. The HAPPY ANNIVERSARY stamp is by Hero Arts. Oh, and I added a little bit of hand-doodling, and some scoring with my Scor-Pal.
Thanks so much for looking, and I hope you’ll come back and visit again soon!
Wednesday, September 3, 2008
Birthday Birdie
Here is a card for today. I really want to try to add something every day, but believe it or not, it’s not my top priority. :)
I used papers from Die Cuts With a View – Nana’s Nursery for Girls. They’re matted with Certainly Celery. “Birthday Wishes” is from Sincere Salutations by Stampin’ Up! and is stamped with Certainly Celery on shimmery white paper and embossed with clear embossing powder. The bird is from Birds Galore by Inkadinkado. I stamped it with Positively Pink, then cut it out. I brayered it with Versamark and embossed it with Iridescent Sparkle embossing powder. Then I brayered it again with Versamark and embossed it with Deep Impressions Clear embossing powder for a nice thick clear coat. It’s mounted on Pop Dots. Three brads complete the card.
Thanks so much for looking, and I hope you’ll come back and visit again soon!
Ladybug Birthday
What a simple card this is - it would make a great addition to a set of cards to give as a gift.
I embossed the circles with a small Cuttlebug folder, then trimmed that piece and mounted it on shimmery black. The ladybug stickers were clearanced at Michael's a couple weeks ago. They are by Sandylion Essentials. The embossed dotted lines are done with a border Cuttlebug folder. I printed out the sentiment on my computer.
Thank you, Deb, for the JAVABLU award!! See the details on Deb's blog, Itty Bitty Inkspots.
Thanks so much for looking, and I hope you'll come back and visit again soon!
Subscribe to:
Posts (Atom)