This card uses the last stamp from the Stampin' Up! set called "Doodle That." I colored with Copics and added a tiny gem to the flower center. I cut the oval out with a Nestability and then embossed the piece with a Sizzix embossing folder, after stamping the sentiment. The sentiment stamp is from PSX. I mounted the entire embossed panel on foam squares.
Thanks so much for stopping by, and I hope you'll come back and visit again soon!
A place for me to share the cards I create, and maybe a few other things, too!
Saturday, August 9, 2014
Friday, August 8, 2014
Doodle That - Part One
Today's set is called "Doodle That." I stamped the background using one of the stamps and Mellow Moss ink. I stamped the flower in black and colored with markers. I matted both pieces with Mellow Moss cardstock and mounted the flower on foam squares. The sentiment is from PSX and is long-retired.
I used the little flower for this card, stamping it in black and coloring with blue and purple. I cut it with an oval Nestability and mounted on foam squares. The little sentiment is from Papertrey Ink.
Thanks so much for stopping by, and I hope you'll come back and visit again soon!
I used the little flower for this card, stamping it in black and coloring with blue and purple. I cut it with an oval Nestability and mounted on foam squares. The little sentiment is from Papertrey Ink.
Thanks so much for stopping by, and I hope you'll come back and visit again soon!
Labels:
Anniversary,
Birthday,
Nestabilities,
PSX,
Stampin' Up!
Thursday, August 7, 2014
Delightful Doodles
I'm going to share all the cards today that I made with this set, but then I might have to start spacing them out a bit. We had company all last weekend, had stuff going on each night this week, and then we're having company again this coming weekend starting tonight. Fun stuff!
Today's set is called "Delightful Doodles." Like many (if not most!) of these small sets, it consists of four stamps. I used the leaf on this first card. I stamped it with fall colors and mounted them each on the same color. The patterned paper background is from an old matstack from Stampin' Up! The sentiment is from Hero Arts.
For this second card, I used the heart. I stamped it in red and used a stamp from a dollar Studio G set for the sentiment. I mounted the image panel on foam squares. I embossed the background with a SU!/Sizzix embossing folder.
I used the remaining two stamps for this last card - the stem and leaves are one stamp and the flower is separate. I used enamel dots for the flower centers. The sentiment is from Papertrey Ink.
Thanks so much for stopping by, and I hope you'll come back and visit again soon!
Today's set is called "Delightful Doodles." Like many (if not most!) of these small sets, it consists of four stamps. I used the leaf on this first card. I stamped it with fall colors and mounted them each on the same color. The patterned paper background is from an old matstack from Stampin' Up! The sentiment is from Hero Arts.
For this second card, I used the heart. I stamped it in red and used a stamp from a dollar Studio G set for the sentiment. I mounted the image panel on foam squares. I embossed the background with a SU!/Sizzix embossing folder.
I used the remaining two stamps for this last card - the stem and leaves are one stamp and the flower is separate. I used enamel dots for the flower centers. The sentiment is from Papertrey Ink.
Thanks so much for stopping by, and I hope you'll come back and visit again soon!
Wednesday, August 6, 2014
Country Collection - Part Two
Here are the remaining three stamps from the Stampin' Up! set called "Country Collection." I stamped them each on white cardstock and colored them with Copics. I carefully trimmed them down and mounted them on a panel of white using foam squares. The sentiment is from SU! also.
Thanks so much for stopping by, and I hope you'll come back and visit again soon!
Tuesday, August 5, 2014
Country Collection - Part One
The last set of my first stack of ten sets. (If you're just joining me, I am on a mission to use all of my Stampin' Up! sets. It will take me a long time, but it's something I've wanted to do for years.)
This set is called "Country Collection." Like many of these small sets, it consists of four stamps. I stamped this image on vellum and colored on the back side with Copics. I embossed the background with a Cuttlebug folder and added the sentiment - from Papertrey Ink. I'll be back tomorrow with a card using the last three stamps from this set.
Thanks so much for stopping by, and I hope you'll come back and visit again soon!
This set is called "Country Collection." Like many of these small sets, it consists of four stamps. I stamped this image on vellum and colored on the back side with Copics. I embossed the background with a Cuttlebug folder and added the sentiment - from Papertrey Ink. I'll be back tomorrow with a card using the last three stamps from this set.
Thanks so much for stopping by, and I hope you'll come back and visit again soon!
Monday, August 4, 2014
Borders Mini
Another set of four small stamps:) This one is called "Borders Mini." Here are the four cards I made using it.
For this first one, I stamped the image three times (lining it up with my Stamp-a-ma-jig.) I hand-drew the stem up through all three squares. I added the leaves and the flower (from a Papertrey Ink set) and mounted the panel on foam squares. The sentiment is from one of my favorite sentiment sets from SU! called Sincere Salutations. The flower and border look a bit like black, but they are actually Rich Razzleberry.
Here is a gift enclosure card that is about three inches square. I trimmed this image down pretty close to the lacy edge. The images are from a Technique Tuesday set. Gosh, they have some teeny tiny stamps! The sentiment is from a Papertrey Ink set.
I decided to put letters inside this next border. I stamped them in red and green and added the letters. I matted with green and mounted on foam squares. I added Stickles to the letters. The background was embossed with a Sizzix Christmas folder. The letters are from an alphabet set from Close to My Heart.
The last border. I added white brads for the flower centers. The background is Swiss Dots by Cuttlebug.
Thanks so much for stopping by, and I hope you'll come back and visit again soon!
For this first one, I stamped the image three times (lining it up with my Stamp-a-ma-jig.) I hand-drew the stem up through all three squares. I added the leaves and the flower (from a Papertrey Ink set) and mounted the panel on foam squares. The sentiment is from one of my favorite sentiment sets from SU! called Sincere Salutations. The flower and border look a bit like black, but they are actually Rich Razzleberry.
Here is a gift enclosure card that is about three inches square. I trimmed this image down pretty close to the lacy edge. The images are from a Technique Tuesday set. Gosh, they have some teeny tiny stamps! The sentiment is from a Papertrey Ink set.
I decided to put letters inside this next border. I stamped them in red and green and added the letters. I matted with green and mounted on foam squares. I added Stickles to the letters. The background was embossed with a Sizzix Christmas folder. The letters are from an alphabet set from Close to My Heart.
The last border. I added white brads for the flower centers. The background is Swiss Dots by Cuttlebug.
Thanks so much for stopping by, and I hope you'll come back and visit again soon!
Sunday, August 3, 2014
Cute Critters
These four stamps make up the Stampin' Up! set called "Cute Critters." I used them all on one card - makes things quicker! LOL!
I stamped each image on scrap white cardstock, cut them with a square Nestability, and colored them with Copic markers. I added a teeny, tiny gemstone to the flower center. I mounted each square on foam squares. It's really hard for me to put things "crooked" but I forced myself to do it. I often start out with some things at an angle, but when it comes time to glue everything down, I end up with things "straight."
Thanks so much for stopping by, and I hope you'll come back and visit again soon!
I stamped each image on scrap white cardstock, cut them with a square Nestability, and colored them with Copic markers. I added a teeny, tiny gemstone to the flower center. I mounted each square on foam squares. It's really hard for me to put things "crooked" but I forced myself to do it. I often start out with some things at an angle, but when it comes time to glue everything down, I end up with things "straight."
Thanks so much for stopping by, and I hope you'll come back and visit again soon!
Saturday, August 2, 2014
Burst Into Bloom
I purchased a LOT of my Stampin' Up! sets after they were already retired - either on eBay or from my SU! demo. This was a set I got new and I don't think I ever used it. Now I have:) It's called "Burst Into Bloom." It's a fine set for cards like these, but I didn't have much imagination for anything else.
There are four stamps in the set. I used one of the flowers for this first card. I matted with matching pink and mounted on foam squares. The sentiment is from Papertrey Ink.
An identical card using a different flower and color. On both of these (and the next one) the flower centers are something that I made! (Well, sort of.) Someone (Thanks, Jan!) told me about melting Perler beads to make your own enamel dots. So, these enamel dots are ones that I melted. I have lots of them to use up!I used the two remaining stamps to make this card. I stamped the background with one and made my usual row of three with the other one:) Again, I matted with matching cardstock. I used all SU! ink for these cards, also.
As I write this, I have finished using my first stack of ten sets. I'm done through the C's in the smallest size. I have a long ways to go, but I'm having fun.
Thanks so much for stopping by, and I hope you'll come back and visit again soon!
Friday, August 1, 2014
August Calendar Page
I will interrupt my massive project to share with you the calendar page that I made for August. If anyone is interested, you can find links to the files under my blog heading. I'd love to hear from you if you use them. If you are not able to get them, please let me know and I can send you the files.
I love this stamp set from Papertrey Ink. I stamped and matted. End of page:) (Times fifteen, though.)
Thanks so much for stopping by, and I hope you'll come back and visit again soon!
I love this stamp set from Papertrey Ink. I stamped and matted. End of page:) (Times fifteen, though.)
Thanks so much for stopping by, and I hope you'll come back and visit again soon!
Thursday, July 31, 2014
Close to Nature
I was able to use all four stamps of the "Close to Nature" Stampin' Up! set on two cards and will share them both with you today.
For the first one, I simply stamped three of the images with Close to Cocoa ink on ivory cardstock. I carefully trimmed right along the edges of the squares and mounted them on foam squares. The sentiment is from a Papertrey Ink set and is also stamped with Close to Cocoa. I matted with Close to Cocoa cardstock.
Here is the fourth stamp from the set. I stamped with Memento black ink and colored with Copics. I added Stickles to the flower, but I don't think you can really see that. Again, foam squares make the image stand out. The sentiment is from PTI.Thanks so much for stopping by, and I hope you'll come back and visit again soon!
Wednesday, July 30, 2014
Stamped Backgrounds
These are the last two cards using the "Background Basics" set from Stampin' Up!
On this first one, I stamped the image with black and colored the leaves and flower centers with markers. I matted with black. The sentiment panel was stamped with Papertrey Ink stamps. I cut the circles with Nestabilities and I used foam squares to mount the panel.
For this card, I stamped the holly leaves with black and then colored with red and green markers. I embossed the top part of the card with a Sizzix embossing folder. I added some pretty green ribbon (I think it's from PTI) across the middle. The sentiment is from Denami. I added a red gem for the dot over the "i" in Christmas and (of course!) mounted on foam squares.
I hope you are enjoying seeing my older sets. I'm sure having fun using them! Stay tuned for "Close to Nature" tomorrow.
Thanks so much for stopping by, and I hope you'll come back and visit again soon!
On this first one, I stamped the image with black and colored the leaves and flower centers with markers. I matted with black. The sentiment panel was stamped with Papertrey Ink stamps. I cut the circles with Nestabilities and I used foam squares to mount the panel.
For this card, I stamped the holly leaves with black and then colored with red and green markers. I embossed the top part of the card with a Sizzix embossing folder. I added some pretty green ribbon (I think it's from PTI) across the middle. The sentiment is from Denami. I added a red gem for the dot over the "i" in Christmas and (of course!) mounted on foam squares.
I hope you are enjoying seeing my older sets. I'm sure having fun using them! Stay tuned for "Close to Nature" tomorrow.
Thanks so much for stopping by, and I hope you'll come back and visit again soon!
Tuesday, July 29, 2014
Celebrate!
These two cards both use stamps from the long-retired Stampin' Up! sets called "Celebrations" and "Background Basics." I kind of struggled with the Celebrations set. But, I'm done with it now! :)
I stamped the stars on the background and trimmed it down a little smaller than the card front. I stamped the blue stars and added the candles and sentiment and matted with red. I also added some Stickles to the flames.
I like my upcoming cards better than these;)
Thanks so much for stopping by, and I hope you'll come back and visit again soon!
Monday, July 28, 2014
Happy Day
I had a chance to create some more cards yesterday. I have completed using six sets so far:) Only about a hundred ninety to go! LOL!
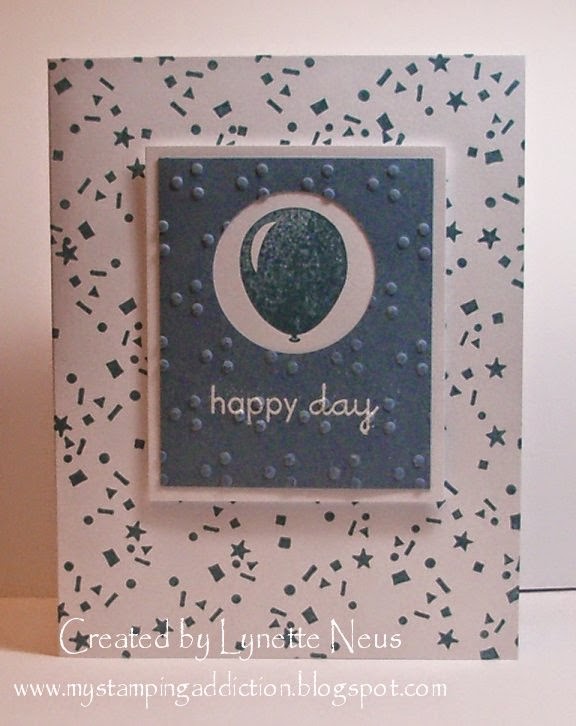
This set uses two stamps from the set called "Celebrations" - the little background stamp and the balloon. (There are a few more and you will be seeing them in the next few days.) I used Buckaroo Blue ink to stamp both the background and the balloon. I cut a piece of Buckaroo Blue cardstock to frame the balloon. I stamped the sentiment (from Papertrey Ink) with Versamark and embossed with white, then I embossed with a Sizzix folder. I mounted that panel on foam squares.
Thanks so much for stopping by, and I hope you'll come back and visit again soon!
This set uses two stamps from the set called "Celebrations" - the little background stamp and the balloon. (There are a few more and you will be seeing them in the next few days.) I used Buckaroo Blue ink to stamp both the background and the balloon. I cut a piece of Buckaroo Blue cardstock to frame the balloon. I stamped the sentiment (from Papertrey Ink) with Versamark and embossed with white, then I embossed with a Sizzix folder. I mounted that panel on foam squares.
Thanks so much for stopping by, and I hope you'll come back and visit again soon!
Sunday, July 27, 2014
Flowery Thank You
Here is the last stamp from the Stampin' Up! Bitty Bouquet set. I colored it with Copics and added the sentiment, which is from Papertrey Ink. The frame was a stamp-off from my friend Annie in Canada. It is stamped and embossed in lavender. I mounted it on foam squares. I also added gems to the flower centers.
Thanks so much for stopping by, and I hope you'll come back and visit again soon!
Saturday, July 26, 2014
How Are You?
The third stamp from Stampin' Up!'s Bitty Bouquets. I colored the image with Copics, added the sentiment (from Papertrey Ink), matted with black and mounted on foam squares. The background was stamped with a Darice stamp and distress ink, and also matted with black.
Here is a picture of the stamps I plan on using.If When I finish these, I have other wood-mounted stamps to use, and then my clear ones and unmounted rubber.
Thanks so much for stopping by, and I hope you'll come back and visit again soon!
Here is a picture of the stamps I plan on using.
Thanks so much for stopping by, and I hope you'll come back and visit again soon!
Friday, July 25, 2014
Christmas Poinsettias
The poinsettia stamp on today's card is from Bitty Bouquets. I colored the image with Copics. The die cut was one I did last month, and I'm assuming it's from Memory Box, although I'm not sure. I mounted it on foam squares. The sentiment is another long-retired SU! stamp.
Some day soon I'll share a picture of the stamps I have plans to use. Also, so you understand why I'm using so many small images, this is the reason: I have my sets arranged by size and then alphabetically. So, the ones I'll be working on for a while are all the small sets. I think I have about 200 sets altogether, so it will take some time.
And yes, Leslie - you are certainly welcome to play!
Thanks so much for stopping by, and I hope you'll come back and visit again soon!
Thursday, July 24, 2014
It Has Begun!
For years I have wanted to start to use all of my Stampin' Up! stamps. I have sets that I have never used. Well, yesterday I started on the project! It will take me a LONG time and the sets are all retired. I will be using other stamps in between, but my plan is to take one stack at a time (about nine or ten sets) and leave them on my table until I have used them all and then get the next stack. I think it will be fun.
These first cards use two sets. One set is shadow stamps and is called "Alpha Shadows." I used each of the four shapes on these four cards. Three of them also use a set called "Birthday Best." Each of the image panels is mounted on foam squares. I paper-pieced the cupcake and frosting on this first card. The candle has Stickles on the flame.
I colored the flower and added a gem for the center.
I hope you will enjoy my project. I think that I will!
Thanks so much for stopping by, and I hope you'll come back and visit again soon!
These first cards use two sets. One set is shadow stamps and is called "Alpha Shadows." I used each of the four shapes on these four cards. Three of them also use a set called "Birthday Best." Each of the image panels is mounted on foam squares. I paper-pieced the cupcake and frosting on this first card. The candle has Stickles on the flame.
I colored the flower and added a gem for the center.
I colored the balloon and matted with green.
This last card uses the last shadow stamp, and also the first of four using "Bitty Bouquets." The sentiment is from Papertrey Ink. I'll probably include this card when I do the rest of the "Bitty Bouquet" stamps, too. I paper-pieced the vase and colored the flowers with Copics.I hope you will enjoy my project. I think that I will!
Thanks so much for stopping by, and I hope you'll come back and visit again soon!
Wednesday, July 23, 2014
hello
Just a simple "hello" card for today. More card parts:)
I embossed this piece soon after receiving my second order of Darice folders, but it had just been sitting on my desk until last night. Before embossing, I brayered sage green ink on it. I trimmed it down to fit the bottom part of the card. I added the ribbon across the top. Then I was trying out different die-cut sentiments and went with "hello." I believe it's from Memory Box. I cut it last month at our Group Gathering, so I'm not sure. I wasn't sure how I was going to get the sentiment to stick to the ribbon, so I used my Xyron.
Thanks so much for stopping by, and I hope you'll come back and visit again soon!
I embossed this piece soon after receiving my second order of Darice folders, but it had just been sitting on my desk until last night. Before embossing, I brayered sage green ink on it. I trimmed it down to fit the bottom part of the card. I added the ribbon across the top. Then I was trying out different die-cut sentiments and went with "hello." I believe it's from Memory Box. I cut it last month at our Group Gathering, so I'm not sure. I wasn't sure how I was going to get the sentiment to stick to the ribbon, so I used my Xyron.
Thanks so much for stopping by, and I hope you'll come back and visit again soon!
Tuesday, July 22, 2014
Cityscape Birthday
I had all evening for creating last night, and I just had no mojo! Oh well, that happens. Hopefully I'll feel like creating again soon AND have some time!
I dug though my stack of pieces from our Group Gathering and came up with this card. The cityscape was stamped with Versamark and then embossing powder was added to one section at a time. I think the embossing powder was a distress powder, but I'm really not sure at all. And I'm sorry to say that I don't know who made the stamp. (Edited to add: The stamp is by Art Impressions. Thanks, Sheri!) The sentiment is a die cut from Memory Box, I believe. I matted with black. I think this will make a fine "guy card."
Thanks so much for stopping by, and I hope you'll come back and visit again soon!
I dug though my stack of pieces from our Group Gathering and came up with this card. The cityscape was stamped with Versamark and then embossing powder was added to one section at a time. I think the embossing powder was a distress powder, but I'm really not sure at all. And I'm sorry to say that I don't know who made the stamp. (Edited to add: The stamp is by Art Impressions. Thanks, Sheri!) The sentiment is a die cut from Memory Box, I believe. I matted with black. I think this will make a fine "guy card."
Thanks so much for stopping by, and I hope you'll come back and visit again soon!
Monday, July 21, 2014
What's Up, Doc?
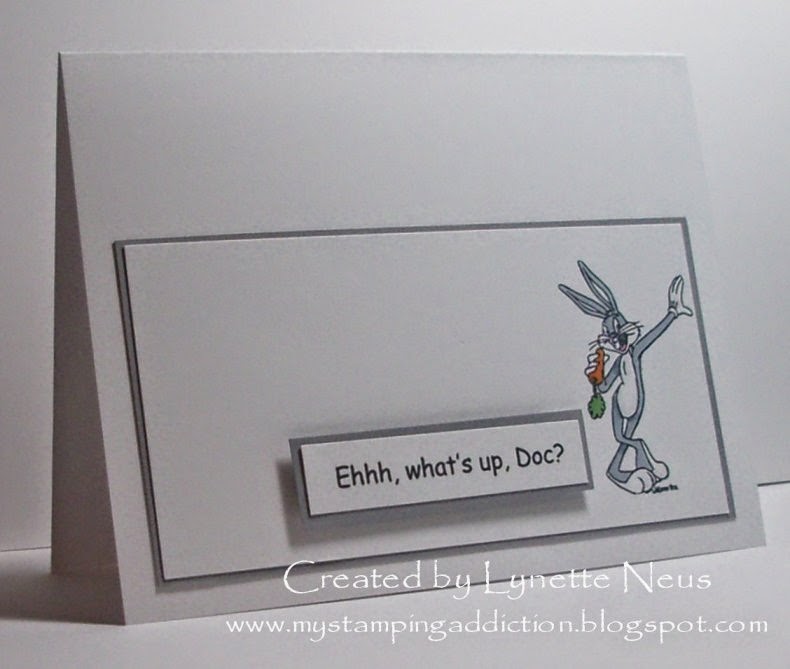
My friend, Sheri, gave me this Bugs Bunny stamp when we were in Iowa last month. I used it to make this card for our grandson, Owen. He likes Bugs Bunny and knows that Bugs says, "Ehhh, what's up, Doc?" I colored the image with Copics and matted with gray. I printed the sentiment on my computer, matted with gray and mounted on foam squares. Thanks, Sheri!
Thanks so much for stopping by, and I hope you'll come back and visit again soon!
Subscribe to:
Posts (Atom)