Saturday, March 31, 2018

Love - Times Three

I had these three "love" die cuts in with my card parts. I'm pretty sure they were cut with a Stampin' Up! die. I decided to just throw them all on the same card. I embossed the background with a Darice embossing folder and popped the panel up on foam squares. I thought it would work as a valentine, anniversary, or even a wedding card.

Thanks so much for stopping by, and I hope you'll come back and visit again soon!

Friday, March 30, 2018

Flowery Thinking of You

Quick post for today. I'm doing this way too late at night! :)

I made the background for this card by rubbing a cheap, multi-color ink pad directly over the cardstock a couple times. The stamps (flowers and sentiment) are both from a set from Inkadinkado. I matted with black and mounted on foam squares.

Edited to add: I forgot to say that I also added "speckles" with an old Stampin' Up! stamp from Itty Bitty Backgrounds - same as a couple days ago:)

Thanks so much for stopping by, and I hope you'll come back and visit again soon!

Thursday, March 29, 2018

Butterfly Birthday

More "card parts." I apologize if you're tired of seeing them, but like I said ... I've been having fun using them up. (I moved on to a few stickers when I finished my loose card parts.) I had the turquoise piece cut in my parts, as well as the butterflies. I cut a piece of white to fit in the rectangle area, added the sentiment (from Inkadinkado) and the butterflies. I also added black pearls to the bodies.

Thanks so much for stopping by, and I hope you'll come back and visit again soon!

Wednesday, March 28, 2018

Tiny Flowers Birthday

The card part on this card is the black, multi-windowed frame. I'm not really sure if the die started out this way, or if I trimmed it down. I decided to fill it in with a couple butterflies and some flowers. The images and the sentiment are all from Technique Tuesday. The image panel is mounted on foam squares.

Thanks so much for stopping by, and I hope you'll come back and visit again soon!

Tuesday, March 27, 2018

Merci

The card parts on this card are the matted stripes and the oval. I mounted the stripes and the oval on foam squares. The sentiment is from Papertrey Ink. I sponged around the edges and added some speckles with an old Stampin' Up! set called "Itty Bitty Backgrounds."

Thanks so much for stopping by, and I hope you'll come back and visit again soon!

Monday, March 26, 2018

Warm Winter Wishes

I used this digital image on my January calendar page. I had printed an extra one, and I came across it in my "card parts." For this card, I very simply colored the image and added the sentiment, which is from My Favorite Things. I added a bit of Wink of Stella to it. I matted with red and mounted on foam squares.

Thanks so much for stopping by, and I hope you'll come back and visit again soon!

Sunday, March 25, 2018

Purple and Gray Color Swap

Our stamping group has a monthly color swap. This month's colors are purple and gray. The flower was in my "card parts." It was die-cut and embossed using textured white-core cardstock. After embossing, I sanded it down to highlight the embossing. I added a gray enamel dot and mounted on foam squares. I used two colors of gray for the matting. I stamped the sentiment (from Papertrey Ink) with Versamark and embossed with clear embossing powder. I also added a little greenery.

Thanks so much for stopping by, and I hope you'll come back and visit again soon!

Saturday, March 24, 2018

Black and Cream Anniversary

I got this self-sticking velvet-y "ribbon" from a friend in my stamping group a while ago. I added it to some textured ivory cardstock and added some scored lines with my Scor-Pal. I matted with black and added the sentiment. The sentiment is from Papertrey Ink.

I have had subscribers unsubscribe because of "too many updates." To anyone who objects, I apologize, but I already have posts scheduled for the next eleven days! I have been having lots of fun in my stamping room, using up "card parts," and I post all the cards that I make.

Thanks so much for stopping by, and I hope you'll come back and visit again soon!

Friday, March 23, 2018

Daisies

Edited to add: I am entering these cards into the Twofer Card Challenge #3 - Blossoms. The challenge can be found here. I thought they were perhaps too similar to each other, but since Darnell mentioned adding them ... here they are!
For some reason, I had these two scalloped circles in my card parts box. I decided to make daisies out of them. I simply cut from the edge, between each scallop, to near the center of the circle. I punched the smaller circles for the centers, embossed them with a Swiss Dots folder, and sponged a little yellow ink on them. For this first one, I added a couple die-cut greenery pieces. The background was embossed with a Darice Wire Fence folder. I don't know who made the sentiment stamp and die - I stamped and cut them when I was at our Group Gathering. I matted the background with black.
This one is even simpler. I matted with an oval that was also in my card parts. On both cards, the sentiment and daisies are mounted on foam squares.

Thanks so much for stopping by, and I hope you'll come back and visit again soon!

Thursday, March 22, 2018

Pop-Out Valentine


Seems kind of silly to make a valentine in March, but here is one, anyway:) In continuing to use up card parts ... I found the die-cut hearts (used in the inside of the card) and the die-cut pop-out "mechanism" in my box. They have now been used in a card. (My smaller "card parts" box is now empty! I'm down to just one box, and it's not large.) I believe the die-cut hearts on the inside are from Stampin' Up!, and I think the sentiment might be from SU! also. The patterned paper on the front is from a matstack by Recollections. I used a die to cut the hearts on the front, also. They were cut from red, and the same paper as the bottom layer. The pop-out on the inside was done with a set of dies I got at Michaels a couple years ago. I don't have the packaging any more, so I'm not sure who made it.

Thanks so much for stopping by, and I hope you'll come back and visit again soon!

Wednesday, March 21, 2018

Snowflake Christmas

Digging through some "card parts," I also found this die-cut snowflake. It was cut from glitter paper and is very sparkly in real life. I cut a panel to put it on and stamped it in black ink with a Papertrey Ink stamp. I used a "metallic" marker that matched the snowflake perfectly to draw along each edge. I mounted the panel on foam squares.

Thanks so much for stopping by, and I hope you'll come back and visit again soon!

Tuesday, March 20, 2018

Card Parts Birthday

I found this stamped panel with the tree in my "card parts," along with the punched and scored fence attached to the embossed grass. I just put them together, added the sentiment, mounted the panel on foam squares and added it to a card front. The tree stamp is from Gina K and I stamped it using the "thumping" technique. (You can see a very simple video I made on thumping here.) The fence punch is by Martha Stewart, the sentiment is from Papertrey Ink and I used a Fiskars texture plate for the grass.

Thanks so much for stopping by, and I hope you'll come back and visit again soon!

Monday, March 19, 2018

Cityscape Simplicity

Two very simple cards today. I've had these two die-cut cityscapes in a box for a few years. I cut them at our Group Gathering in Des Moines, once upon a time. (I don't know off-hand who makes the die, but I can find out.) To finish each card, I simply added a piece of patterned paper behind the die cut. The paper is from a Recollections holiday matstack. (This is from the October section:) The original sheet was 8.5 x 11, and I trimmed it down.) The sentiment is from Papertrey Ink.
 Thanks so much for stopping by, and I hope you'll come back and visit again soon!

Saturday, March 17, 2018

Stenciled Leaves

These flowers were the last of the "card parts" that were out on my table. I certainly have a lot more, but they are filed away. It feels really good to have used the ones that were just laying around. (Although, as I type this, I have just spent some time in my stamping room and have gotten more parts out!) At any rate, the flowers were pre-made and came off of another card. I mounted them on foam squares. The leaves were done using two colors of green ink and a Memory Box stencil. The sentiment is from Papertrey Ink. After seeing the picture, I notice I should have used a much larger font:(

Thanks so much for stopping by, and I hope you'll come back and visit again soon!

Friday, March 16, 2018

Pink Thanks

Another item I'd like to make use of is my border punches. So many things that are collecting dust! (Actually, they are in a cabinet, so not getting dusty, but also I'm not even seeing them most of the time!) Anyway, the "THANKS" was done with a Martha Stewart border punch. I scored the lines underneath it with my Scor-Pal. The image was stamped with an Inkadinkado stamp. The background was embossed with a Darice embossing folder. I believe it's called "Wire Fence." I mounted the image panel on foam squares.

Thanks so much for stopping by, and I hope you'll come back and visit again soon!

Thursday, March 15, 2018

Elegant Embroidery #2 - #6

A short while ago, I posted a card that I made with the Stampin' Up! set called "Elegant Embroidery." I said at that time that it would probably be the only card I would post with it. Well, I was wrong:) I still had most of these pieces sitting on my table and just couldn't throw them away, as usual. So, here they are. Several of them are very similar. This embossing folder is an Anna Griffin by Cuttlebug. The stamped image is matted and mounted on foam squares. I stamped it with a Kaleidacolor pad.
This image was colored with markers before stamping.
The lacy-stamped panel is mounted on foam squares. The sentiment is from Papertrey.
I stamped the leafy design  five times, lining it up with my Stamp-a-ma-jig. I scored the lines with my Scor-Pal. The sentiment is from Papertrey. I stamped it with Versamark and embossed it with clear embossing powder.

This image was also colored with markers before stamping. And there you have them!

Thanks so much for stopping by, and I hope you'll come back and visit again soon!

Wednesday, March 14, 2018

Stenciled Sympathy


For this card, I used a small, very-thin plastic stencil. I did the stems with a stipple brush and brown ink. I did the leaves with a sponge pad, using two colors of green ink. The sentiment is from Papertrey Ink. I matted with brown cardstock and mounted on foam squares.

Thanks so much for stopping by, and I hope you'll come back and visit again soon!

Tuesday, March 13, 2018

(Almost) No-Lines Coloring

I have tried "no-lines" coloring in the past and have never been remotely happy with my results. But, I tried again. (No-lines coloring is when you stamp your image with a very light ink, then color it so that you can't see the lines.) I think it's usually done with water coloring. For today's card, I used Copic markers to color. I'm much happier with the way it turned out! You can still see the lines in the leaves and the pink flower, but not too much. The flower image is from Stampendous. The sentiment is from Papertrey Ink. I cut the panel with a stitched rectangle die from Memory Box and mounted it on foam squares at an angle.

Thanks so much for stopping by, and I hope you'll come back and visit again soon!

Monday, March 12, 2018

Hand-embossed Border, and Brass Stencils

Going through some supplies the other day, I came across these old brass stencils. The embossed border was done - by hand! - with a Stampin' Up! stencil. The smaller panel was done with a different one. I used a stipple brush to dab ink through the stencil. I used a marker for the small dots. I added tiny gems to the flower centers. I matted each layer with raspberry cardstock. The small panel is mounted on foam squares. The sentiment is stamped with Papertrey Ink stamps.

Thanks so much for stopping by, and I hope you'll come back and visit again soon!

Sunday, March 11, 2018

Double-Flower Birthday

This is the second of four cards I made on Thursday. I had such a nice time in my stamping room just looking around and picking things that I wanted to use. :)

For this card, I used a small Papertrey Ink set. The flowers and leaves are from the set. The larger purple flower was stamped directly on the white panel. I stamped all the leaves and the smaller flower and cut them out. I mounted the small flower and small leaves on foam squares before attaching them to the panel. For the larger leaves, I cut around the flower petals and inserted the leaves. The sentiment is from Impression Obsession and is stamped to match the larger flower, and the matting is the same color.

Thanks so much for stopping by, and I hope you'll come back and visit again soon!

Saturday, March 10, 2018

CAS Christmas Challenge


I really don't participate in a lot of challenges, but this one called my name:) It's a new Clean and Simple (CAS) challenge to do Christmas cards. Since I do my Christmas cards throughout the year, it works for me! The theme of this month's challenge is "holly."

I had been looking through my brass stencils the other day, so they were on my mind. When I saw "holly" I immediately thought of this stencil. I embossed it with my BIGkick, rather than hand-embossing it. So much easier! I matted it with red and mounted on foam squares. The patterned paper is from a Recollections matstack that I've had for years. I matted that with red, also.

Thanks so much for stopping by, and I hope you'll come back and visit again soon!

Friday, March 9, 2018

Black, White and Red Birthday

Last week I went to JoAnn's because they had some things 60% off, and I had a gift card. I bought some more paper, of all things! LOL! So, I wanted to use some right away. I got some foil cardstock and some patterned double-sided paper. I used both on this card. The black is foil. Both of them are from Die Cuts With a View. I went "old-school" and added an eyelet again. Also, I folded down the corner to show the back of the cardstock. I matted with a textured red cardstock and mounted the panel on foam squares.

Thanks so much for stopping by, and I hope you'll come back and visit again soon!

Tuesday, March 6, 2018

Recycled Daisies


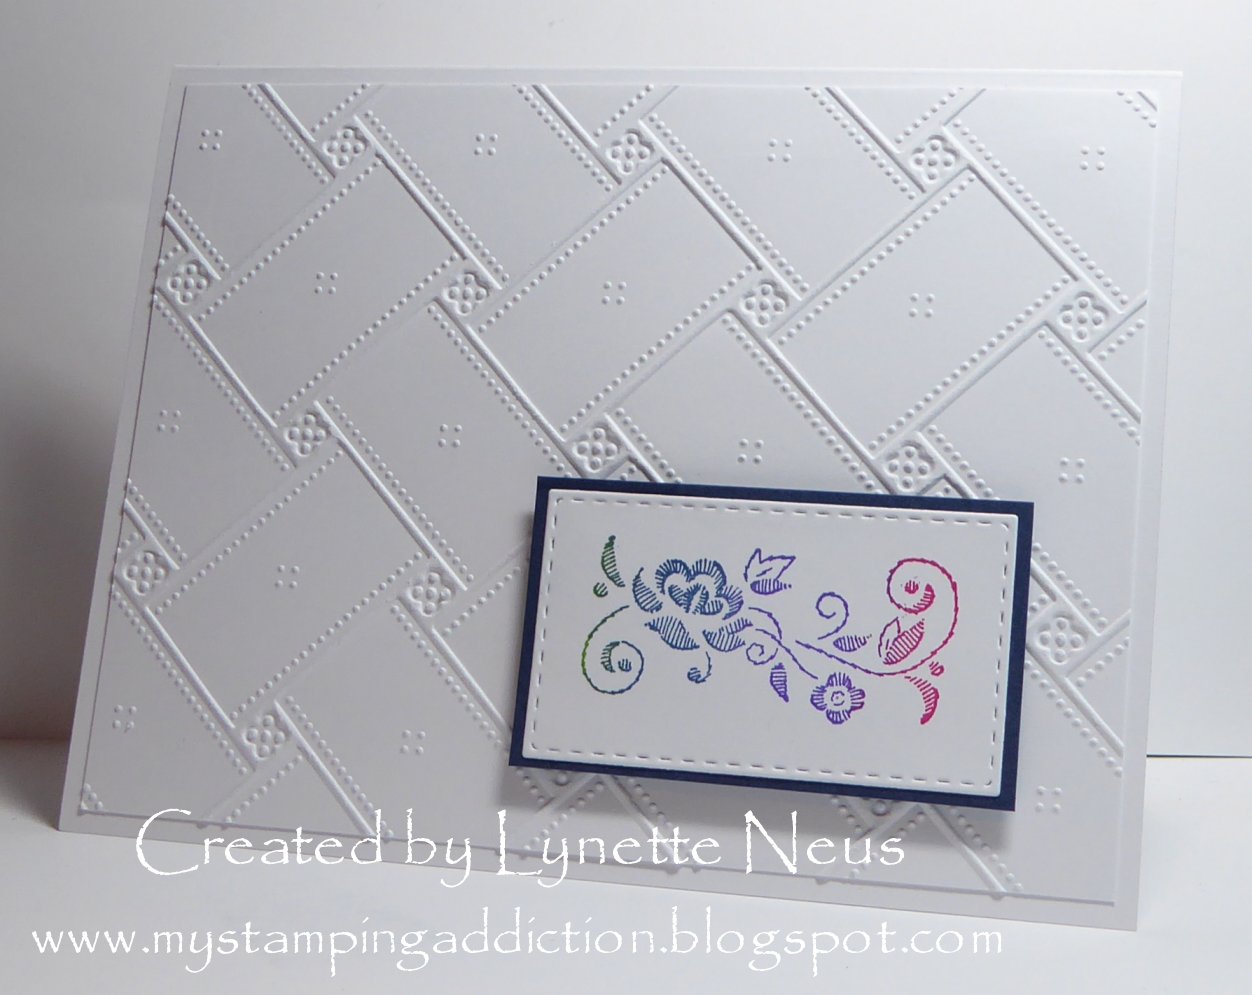
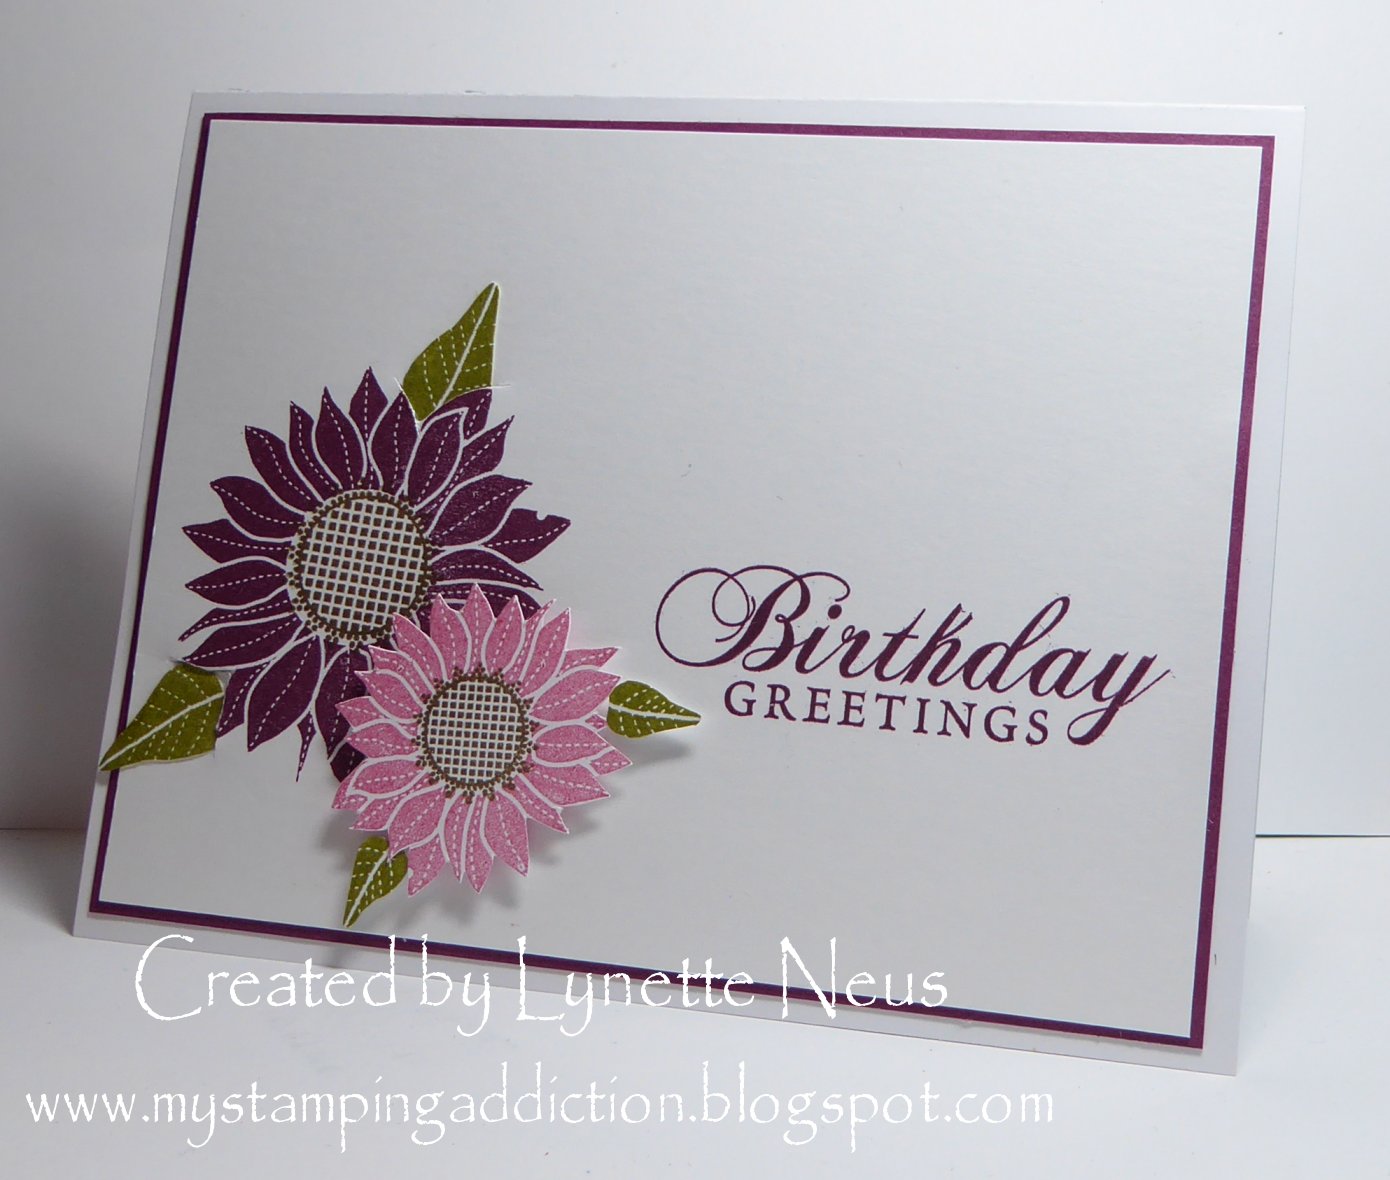
I have another card to share with you today. It uses a piece that I salvaged from another card. It's possible this is its third card! Maybe I'll actually send it out this time. The "recycled" piece is the daisies. I trimmed around the edges for this card. They were done with a Dreamweavers stencil, embossing paste and glitter. I can't get the color to show up very well, but here is the card that was on my blog three years ago yesterday! In that post, I link to a tutorial I did on this embossing technique a long time ago. The sentiment is one stamp which I inked up twice - in black and green. It's from Paper Inspirations.

Thanks so much for stopping by, and I hope you'll come back and visit again soon!

Monday, March 5, 2018

Happy Hello

This card makes me happy and was fun to make:) Not a lot to it, but it was just a "because" card and not some pieces or stamp set that I felt that I HAD to use.

I cut the design out with a Memory Box die and backed it with textured pink cardstock that just happened to be out on my table from making Valentines. I mounted the panel on foam squares. The sentiment - in two pieces - is from Papertrey Ink and is stamped with matching pink ink, along with black.

Thanks so much for stopping by, and I hope you'll come back and visit again soon!

Sunday, March 4, 2018

Bunny Scene

I got this stamp and die set a while back and used it right away for these pieces. I even started making the card, but just never got it finished. Friday morning I "got 'er done." I colored the pieces with Prismacolor pencils and used Gamsol on them. I popped some of them up on foam squares. The "grass" was embossed with a Fiskars texture plate. I thought I had some die-cut clouds somewhere, but I couldn't find them. But, Thursday night I had gone to Joann's to use a gift card and take advantage of a sale. I found this embossing folder by Darice and knew it would help me to finish this card. I embossed a piece of blue cardstock with the folder and then took a white ink pad and rubbed it over the clouds to make them white. That was what I needed to finally finish it up:)

Thanks so much for stopping by, and I hope you'll come back and visit again soon!

Saturday, March 3, 2018

Festive Favorites


I finally was able to create something in my stamping room. Either I've just been too busy, or else I have no mojo. But it was so nice to have both time and mojo recently. For these cards, I used the Stampin' Up! set called "Festive Favorites." It was sent to me by an on-line friend several years ago. (Thanks, Gloria!) I wasn't very inspired, though, so these cards are basically all alike. I used a Stampin' Up! tag punch for the tags. The backgrounds were embossed with a Darice folder. The sentiment is from Papertrey Ink. I sponged around the edges with red ink and popped up the sentiment and tags with foam squares. These are the only cards I'll be making with this set at this time. I have made several cards with it, and have used it for a January calendar page. Here are two of the other stamps in the set: 


I used the sentiment on the insides of these cards. There is also one more small stamp with snowflakes on it. I almost forgot - I also used my Crop-o-dile (remember them?) and eyelets! Oh, and a little bit of Wink of Stella, too.

Thanks so much for stopping by, and I hope you'll come back and visit again soon!

Thursday, March 1, 2018

March Calendar Page

Here is my March calendar page. The shamrocks were cut with a die. The patterned paper is from a Recollections pad. The sentiment is from an old Studio G dollar stamp set.

Edited to add: Not sure why I even called this a "shamrock," but I stand corrected. It is a four-leaf clover. Thank you to my anonymous commenter:)

You can find the Excel file for my calendars through the links under my blog title. If you use them, I would love to hear from you!

Thanks so much for stopping by, and I hope you'll come back and visit again soon!