Friday, March 11, 2011

Happy Anniversary to The House That Stamps Built!


Today is a special day at Repeat Impressions.  Today, the blog, The House That Stamps Built, celebrates its first anniversary!  We are having a “Blogaversary” party for this special occasion.

All the Repeat Impressions Rock Stars have created cards commemorating the event, and we’re asking our readers to help us!  Just create a card that celebrates, congratulates or simply wishes a Happy Anniversary.  You can participate in two ways:
1)  You can “hop” your way around to each of the Rock Stars’ blogs and leave a comment on each blog (including the Repeat Impressions blog – don’t forget that one!) and you will be entered in the random drawing for a Repeat Impressions gift certificate.
2)  Follow all the rules above, plus create a card to celebrate our Blogaversary and link it to the RI Blogaversary Hop post.  By uploading a card, you will earn three entries into the drawing!  You don’t have to use RI stamps, but we’d love you to use them if you have them!

Please visit the Repeat Impressions blog, The House That Stamps Built, for all the details and be sure to leave a comment.  Cards and comments will be accepted until Wednesday, March 16th.  The winner will be announced on March 18.  One lucky stamper will win a $35 Repeat Impressions gift certificate!  Here is a link to the other RI Design Team members’ blogs:

For my card, I used the 904-L, Daffodils stamp, found on this page.  I colored it with Prismacolor pencils and Goo-Gone.  I cut it and embossed it with an oval Nestability.  I sponged yellow inside the oval before removing it.  It was still lacking something, so I added the dashed lines around the edge of the Nestability.  The butterfly (107-F Monarch Butterfly) is from RI, also.  You can find it here.  I colored it with Copics, then I cut it out. I stamped it on the edge of the daffodil panel also and mounted the oval layer on foam squares.  I used large scalloped Oval Nestabilities for the matting.  The paper is from My Mind’s Eye.  The sentiment is from Repeat Impressions, also, of course!  (The greens actually match in real life!!)

Thanks so much for stopping by, and I hope you'll come back and visit again soon!

Thursday, March 10, 2011

Happy 16th Birthday, Brooke!

I made this card for my neighbor.  She turned 16 yesterday.  I can't believe it!  I used to do day care for her when she was just one year old!


I used an EK Success border punch, and then embossed the design with a Cuttlebug border folder.  I also scored a single line with my Scor-Pal.  The letters are cut with my Hippie Chick alphabet die set from Cuttlebug.  The paper is from My Mind's Eye Simply Delightful.  That's about all there is to it! 


Thanks so much for stopping by, and I hope you'll come back and visit again soon!

Wednesday, March 9, 2011

Repeat Impressions WHAT IF? Wednesday Sketch

Today starts a new WHAT IF? Wednesday Sketch challenge from Repeat Impressions.  Here is this week's sketch:
We would love to have you play along with us!  Just make a card using this sketch, upload it to your blog or on-line gallery, and leave a link to it on the Repeat Impressions blog, The House That Stamps Built.  You can also find all the details on the blog.  One random winner for the month will win a $25 gift certificate to Repeat Impressions.  Check out the Rock Stars' creations:

For my card, I started with the 630-H, Iris stamp from Repeat Impressions.  (You can find it on this page.) I colored it with Copic markers.  I cut the circles with Nestabilities and sponged a little light yellow ink around the edges.  The patterned papers are from a Die Cuts With a View Nana's Nursery Baby Boy matstack.  The sentiment is from Repeat Impressions.  The butterflies are punched with a Martha Stewart punch.  I can't wait to see what you come up with - have fun!

Thanks so much for stopping by, and I hope you'll come back and visit again soon!

Tuesday, March 8, 2011

Letterpress Thank You

I finally got another Letterpress card done.  I'm excited to make more, but my mojo seems to be missing!  I'll keep working at it.

At any rate, here is a simple card that I think would make a great wedding Thank You card to be mass-produced.  (That's the beauty - well ONE of the beauties! - of the Letterpress.  Once you get it set up, you just brayer the ink on the plates, and run it through your die cutting machine.)  I combined three plates.  The scrolly flourish is from this set.  The sentiment and straight-line flourish are from other sets.  The color I used is Dark Purple.  I added a small pearl to the straight-line flourish.  The Letterpress de-bosses and inks.  Pretty cool!  The Letterpress Starter Kit is available here.

Many (most?) items from Creating Memories in Time now have free shipping.  (Not the Letterpress Starter Kit, though.)  Check it out:)

Thanks so much for stopping by, and I hope you'll come back and visit again soon!

Monday, March 7, 2011

Baby Boy - and Repeat Impressions Stamp of the Week

I saw this link and thought it was a cool card.  I wanted to make it "normal" size, though, so I started with a piece that was 12 x 5.5 inches.

I used a textured white cardstock for the base.  The blue is also textured, and then embossed with a Swiss Dots folder.  The "hello" is a Papertrey Ink stamp.  The "little one" is a rub-on.  The cute little blue zebra is a puffy sticker.  Here is a picture of the card opened up.

Today is Monday, so that means it's time for a new Repeat Impressions Stamp of the Week.  I'm sorry to say I don't have a card to share with you today using the new stamp.  This week's stamp is 4215-I, Bunny Hop.  You can find it on this page.  Please visit the Repeat Impressions blog, The House That Stamps Built , for the necessary details to purchase this stamp at 50% off this week only.  You will also find the awesome cards created by the other Rock Stars.  Remember to check out the WHAT IF? Wednesday challenge and the CASE challenge, too. 

Thanks so much for stopping by, and I hope you'll come back and visit again soon!

Saturday, March 5, 2011

Simple "Card Parts" Birthday

I really wanted to make some cards yesterday, but just couldn't do it.  So, I'm sharing a super-simple card I made last week. 

The image in the center came from my "card parts" pile.  I mounted it on foam squares, then I mounted the middle layer on foam squares.  Before putting it on the card base, I used a square Nestability to emboss the frame on the card front.  The sentiment is from Papertrey Ink's Birthday Basics set.  When it was complete (or so I thought!) it just didn't seem finished, so I hand-doodled the border on the middle layer.

Thanks so much for stopping by, and I hope you'll come back and visit again soon!

Friday, March 4, 2011

Turquoise and Black Birthday

Another card using my new Martha Stewart border punch.

I started by punching the horizontal border.  Then I matted it on black.  Then I used the scrap pieces to put under the black to make the turquoise mat.  I used a Fiskars punch to do the vertical border.  The black paper with turquoise dots started out with white dots:)  I had a highlighter marker out for other purposes, and happened to notice it matched my turquoise cardstock exactly!  The flower started out white, also.  I added a little black gem to it.  The sentiment is from Papertrey Ink.  (I noticed that the very same stamp is in two of their sets - Birthday Basics and Year-Round Puns.)  Just an easy card.  It's also the last one that I have to blog about.  Hopefully I can get something done today for tomorrow!

Thanks so much for stopping by, and I hope you'll come back and visit again soon!

Thursday, March 3, 2011

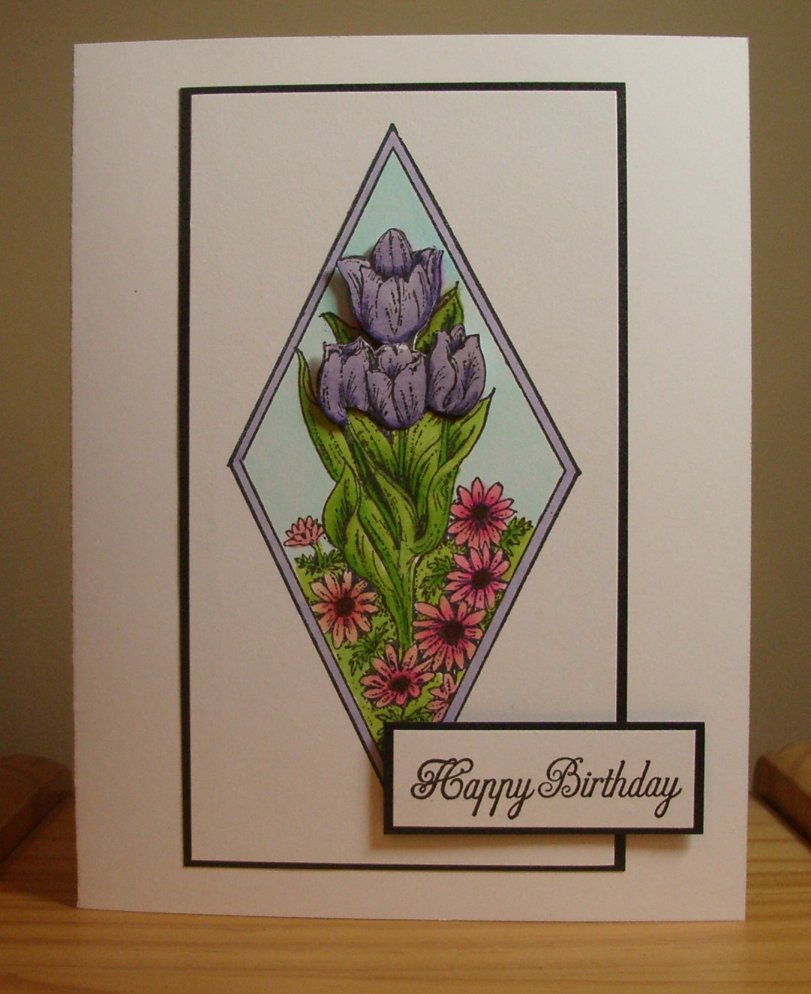
Tulip Birthday

 I have a simple card to share with you today.  Taking care of a newborn sure cuts into one's stamping time!  What a wonderful thing to be able to do, though.  I'm loving it!  (I'm taking care of our new grandson.  He's about two and a half months old.)

The stamp on this card is from Northwoods.  I colored it with Copic markers.  I stamped again, colored the tulips, and cut them out.  I mounted them on pieces of foam squares.  After I put them on the full piece, I glued down the bottoms of them so that the whole piece did not stick up - a little more life-like.  I matted with black.  The sentiment is from Papertrey.

Thanks so much for stopping by, and I hope you'll come back and visit again soon!

Wednesday, March 2, 2011

Repeat Impressions CASE Challenge - CASEing Harriet

Wednesday is challenge day at Repeat Impressions, and today it's another CASE challenge.  Be inspired by this card by Harriet and create your own masterpiece based on Harriet's card, below.   
Please visit the Repeat Impressions blog, The House That Stamps Built, to find out all the details on how to win a full sheet of unmounted rubber!  You will also find the cards by the other Rock Stars.  Or you can follow these links to the Design Team members' blogs.

For my card, I used the Repeat Impressions stamp 5910-M, Party Negative, found on this page.  I stamped it with Versafine Onyx Black ink on My Mind's Eye paper and embossed with black embossing powder.  (The upper right corner looks like I didn't get it stamped well, but it's just the light reflecting off of the embossing.)  I trimmed it down and matted it on black paper which I had punched with a Stampin' Up! border punch.  The bottom matting is also from My Mind's Eye (Simple Delightful - and it really is!) and is matted with black.  I also used some grosgrain ribbon.  Won't you join us??

Thanks so much for stopping by, and I hope you'll come back and visit again soon!

Tuesday, March 1, 2011

March Calendar Page

Wow - another new month!  The year is just flying by!!

I found this clip art of kites from Microsoft.  I paper-pieced the kites with paper from Die Cuts With A View Fun in the Sun matstack. I used markers to color the tails.  I sponged the edges with Bliss Blue ink (from Stampin' Up!) and used Frosted Lace Stickles on the clouds.  The sentiment is from a dollar set from Studio G.

If you would like my Excel file to create your own calendar pages, you can find a link to that page of my blog in the blog header - above my latest post.  EDITED TO ADD: In response to a comment - there are tabs on the bottom of the Excel sheets which have the other two pages for the rest of the months.  The first tab has January - April, the second tab has May - August, and the third tab has September - December.  Hope that helps!

Thanks so much for stopping by, and I hope you'll come back and visit again soon!

Monday, February 28, 2011

Repeat Impressions Stamp of the Week - Mountain Vista

This week's Stamp of the Week from Repeat Impressions is called 629-I, Mountain Vista.  You can find it on this page.  It is available for THIS WEEK only (through Sunday night) at 50% off the regular price.  You can find the details on how to purchase it on the Repeat Impressions blog, The House That Stamps Built.  You can also find the great cards made by the other Rock Stars on the blog.  Or, you can follow these links:

I stamped the image with Memento black ink and colored with Copics.  I added Diamond Glaze to the sun and Star Dust Stickles to the water.  (Here is another angle, so you can see the sparkle better.)  I stamped the sentiment, also from Repeat Impressions, on the bottom and added double scored lines across the middle.  The striped paper is from Die Cuts With A View Mediterranean Cafe. The black matting is shimmery.  I punched the photo corners (with a Stampin' Up! punch) out of the same shimmery paper.

Thanks so much for stopping by, and I hope you'll come back and visit again soon!

Sunday, February 27, 2011

White Birthday

I love Clean and Simple (CAS) white cards.  Here is just another example.

The black border is punched with a Martha Stewart punch.  I used Papertrey Ink Aqua Mist ribbon to thread through the punches areas.  I scored lines with my Scor-Pal above and below the punched border piece.  The butterfly is punched with a Martha Stewart punch from Papertrey Ink Aqua Mist cardstock and I sponged some black ink around the edges.  I added black gems for the body.  The sentiment is also from PTI - Birthday Basics set. 

Thanks so much for stopping by, and I hope you'll come back and visit again soon!

Saturday, February 26, 2011

Simple Sympathy

I was in need of a sympathy card yesterday, so I went with my "go-to" set for sympathy cards - Thoughts and Prayers from Stampin' Up!

This card is similar to others I have done, but since I have nothing else to share with you today, you get it again:)  It's certainly not exactly like any I've done before, after all!  I inked up the stamp itself with Stampin' Up! markers - Certainly Celery and Almost Amethyst.  I misted it with water before stamping to give it a smooth stamping.  I added tiny pearls to the center of each flower.  I matted with Almost Amethyst cardstock.

EDITED TO ADD:  Glenda - yes, I misted the stamp after I colored it with markers.  You need to moisten the stamp after coloring with markers because they dry so fast.  Normally I just "huff" on them and that works fine.  This time I used a mister (filled with water) to moisten it and make it stamp nice and evenly.  If you colors are dark enough, you can mist it again and get another (light) stamping from one coloring.  Hope this helps!

Thanks so much for stopping by, and I hope you'll come back and visit again soon!

Friday, February 25, 2011

My First Letterpress Card

The Design Team members of Creating Memories in Time received Letterpresses from Lifestyle Crafts.  I'm so excited!!  I've been waiting for mine since I saw it demonstrated at CHA and was told I'd be getting one.  It came yesterday.  However, I'm now babysitting our newest grandson, and don't have as much crafting time as I used to!  (It's wonderful, though - I love it!)

Anyway, I took a few minutes last night and made this card.  What the Letterpress does is to "de-boss" the design and put the ink in the debossed area.  It's great for mass production, too, as you place the design pieces (the "plates") where you want them and stick them in place.  Then you add the ink and run it through your die cutting/embossing machine.  (I'm using my BIGkick.)  I know that's not much explanation, but I'm hurriedly doing this post.  I hope to have something more to share with you tomorrow.  For now, this will have to do.  The flowers and the sentiment are both done with the Letterpress.  I added the ribbon and the matting, which is from Papertrey Ink.  I just used regular cardstock, but the starter kit comes with thicker, plusher paper.  I was just kind of experimenting quickly.  You can find the Starter Kit in the Creating Everlasting Memories eBay store, here.

Thanks so much for stopping by, and I hope you'll come back and visit again soon!

Thursday, February 24, 2011

Glitter, Stencils and Sticky Paper

We have a challenge in our Yahoo! group this month of using a brass stencil in some way.  I chose to use glitter.

The stencil I used is from Stencilabilities.  The technique I used is this:  You soap up the stencil so it doesn't stick permanently, but you use double-sided sticky paper to adhere the stencil to a piece of cardstock.  Then you use glitter (I used my multi-pack of Martha Stewart glitter) and carefully use it to "color" your stencil.  When finished, you remove the stencil and sprinkle clear glitter over the rest.  I matted this piece with some green shimmery cardstock and mounted on foam squares.  The two different patterned papers are both from a Green Matstack from Die Cuts With a View.  The sentiment is a rub-on from Stampin' Up!

Thanks so much for stopping by, and I hope you'll come back and visit again soon!

Wednesday, February 23, 2011

Repeat Impressions WHAT IF? Wednesday Sketch

Time for a new WHAT IF? Wednesday challenge from Repeat Impressions.  Every two weeks, we have a new sketch from Wendy and we get to work creating our cards using the sketch.  We invite you to join along!  Just make a card using the sketch, upload to your blog or an on-line gallery, and link to the Repeat Impressions blog.  You can find all the details on the blog, The House That Stamps Built.  One random winner for the month will win a $25 gift certificate.  Here is the sketch:
And here are links to the other Rock Stars' creations.

For my card, I started with the Vase of Tulips stamp, found on this page.  I stamped with black ink and embossed with black embossing powder.  I colored with Copic markers and matted with black cardstock.  I mounted on foam squares.  The patterned paper is from Die Cuts With a View.  I added pearls, per the sketch. 

Thanks so much for stopping by, and I hope you'll come back and visit again soon!

Tuesday, February 22, 2011

Blue and Lavender Challenge -and a Blog Award

I made this card for a swap challenge for my Yahoo! group.  The challenge was to use blue and lavender.

My image is from Stampin' Up!'s Fishy Friends set.  I stamped it with Memento black ink and colored it with Copic markers.  After coloring, I misted it with Tattered Angels Glimmer Mist - Glacier.  (Among other places, it's available in the Creating Everlasting Memories eBay store.  Here is a link to the store.)  I matted with blue SU! cardstock.  I also misted the white piece across the center with the Glimmer mist.  The sentiment is from Papertrey Ink's set called Pond Life Sentiments.  The purple patterned paper is from Die Cuts With a View.  I sponged SU!'s Brocade Blue ink around the edges.  The main image panel is mounted on foam squares.

I also want to thank my friend, Vicki, for giving me a blog award.  She has awarded me a Liebster Blog award.  It is to bring new visitors to beginning blogs.  Thanks, Vicki!  I don't usually pass these awards on, but I did want to acknowledge the award.

Thanks so much for stopping by, and I hope you'll come back and visit again soon!

Monday, February 21, 2011

Repeat Impressions Stamp of the Week - Raggedy Ann and Andy

Monday has arrived again, and so has another Repeat Impressions Stamp of the Week!  This week's stamp is 902-I Raggedy Ann and Andy.  You can find it on this page.  For this week only, through Sunday evening, you can purchase this cute stamps for 50% off.  To learn all the necessary details, please visit the Repeat Impressions blog, The House That Stamps Built.  You can find all the creations by the RI Rock Stars there, also.  Or just follow these links:

For my card, I stamped the image and colored it with Copic markers.  I embossed the bottom of the image panel with a Cuttlebug Swiss Dots folder, then scored lines with my Scor-Pal.  I added the ribbon and matted with Stampin' Up! Riding Hood Red cardstock.  I mounted the image on foam squares.  The sentiment is from Repeat Impressions, also. 

Thanks so much for stopping by, and I hope you'll come back and visit again soon!

Sunday, February 20, 2011

Happy First Birthday, Sweet Amelia!

I got some My Mind's Eye "Lush" products just before we left on vacation.  (We were in Cocoa Beach, Florida from Saturday to Saturday.  What a great week!) This is the card I made using some of them.  It's for our granddaughter's first birthday, which is the end of March.

All of the parts of this card are from the Lush line except the textured off-white under the 1.  The letters are lightly flocked.  The ribbon is velvety and has a scalloped edge.  So pretty.  I had to search through a lot of stamps to find the "sweet."  I finally found this one on a Hero Arts stamp.  (The Creating Everlasting Memories eBay store will probably begin carrying the Lush products soon.)

Thanks so much for stopping by, and I hope you'll come back and visit again soon!

Saturday, February 19, 2011

Pink Birthday - SCS Sketch Challenge

I made this card last week when I needed some quick cards and was looking through my stickers/rub-ons drawer.  I used last week's SplitCoastStampers Sketch Challenge.

I came across this "label" from Martha Stewart that I got clearanced a while back at Michael's. The borders were on it, and so was the flower. I just stamped the sentiment - from Papertrey Ink's Birthday Basics set. I used my Martha Stewart scoring tool to score the lines on the side. The patterned paper is from an older pad from Stampin' up!

Thanks so much for stopping by, and I hope you'll come back and visit again soon!