Saturday, November 30, 2019

I Said I Wouldn't Do It! ...


I was wrong! :( I said I would NOT be making any more Christmas cards this year. But ... I did. It just happened. And even this is not the end of them. I will be adding more tomorrow and the next day, for sure! I love this snowflake stencil from Echo Park and I did so want to use it with glitter. I covered a piece of white cardstock with my Die Cut and Bond and then placed the stencil over it. I added the bluish glitter and removed the stencil and added the pearl glitter. I added the silver strip and the sentiment (from Papertrey Ink) embossed with silver.
Ditto for this card.

Thanks so much for stopping by, and I hope you'll come back and visit again soon!

Friday, November 29, 2019

Glitter, Glitter Everywhere!


I used my new-to-me Die Cut and Bond,  a The Crafter's Workshop stencil, and glitter for these cards. I love the sparkle of glitter! Any my stamping room is so sparkly, too! LOL! I covered a piece of cardstock 5.5 x 4.25 with the Die Cut and Bond. Then I removed the backing and added the stencil. I used some Martha Stewart glitter to cover the entire panel. Then I removed the stencil and added another color of glitter. I cut 1.5 inches off of each side and added them to this card front. Then I added a thin strip of silver paper beside the panels. I also added the die-cut sentiment. I put Diamond Glaze on the die-cut, but I'm not sure that was very effective.
I used the remaining section for the bottom of this card. I added a blue strip of cardstock above the panel. The sentiment is from Papertrey Ink.

Thanks so much for stopping by, and I hope you'll come back and visit again soon!

Thursday, November 28, 2019

Happy Thanksgiving!

Just a wish for a Happy Thanksgiving to all of my American friends. I hope this holiday finds you surrounded by good friends and family.

Thanks so much for stopping by, and I hope you'll come back and visit again soon!

Wednesday, November 27, 2019

Winter Birthday


I recently purchased some Die Cut and Bond so that I could use my stencils with glitter. (You'll be seeing a few of those coming up.) I also knew it would be useful for adhering die cuts. So, I pulled out a few of my dies and cut pieces using cardstock covered with the sticky paper. This is one of the dies that I used. For the background, I used brushes and distress inks. After doing that, I took some gouache (a type of white acrylic paint, as far as I can tell) mixed it with water and splattered it on the background. The sentiment is from Papertrey Ink.

Thanks so much for stopping by, and I hope you'll come back and visit again soon!

Monday, November 25, 2019

Printed Vellum

While digging for some vellum or acetate recently, I came across this already-cut piece of printed vellum. I decided to use it up right then and there! :) I simply stamped and embossed (in gold) the sentiment, which is from Papertrey Ink. I added a thin strip of gold foil to the left side.

Thanks so much for stopping by, and I hope you'll come back and visit again soon!

Sunday, November 24, 2019

3-D Embossing

Both of the image panels were embossed at our Group Gathering. I think they were done with 3-D embossing folders from a company in England. I finished them up very simply. A corner of this first panel was accidently cut off, so I straightened it out and cut the opposite corner to match, then matted it and stamped the sentiment along the diagonal edge. The sentiment is from Kaisercraft.

EDITED TO ADD: The embossing folder is from Stampin' Up!Thanks, Vicki!
The sentiment on this one is from Papertrey Ink. I have sure used it a lot lately! I do love it, along with the birthday sentiment that came in the same set. :)

Thanks so much for stopping by, and I hope you'll come back and visit again soon!

Saturday, November 23, 2019

Stamped Flowers

These first five cards all use flowers and shaped sentiment panels in my "stash." All of the flowers in this post except the second card use Sunny Studio stamps and dies. I think the second one is from Gina K. I think the patterned paper is all from Die Cuts With a View.


I embossed the top panel of this card with a Darice embossing folder. The flowers are mounted on foam squares. All of these cards are headed up to church for card rack.

Thanks so much for stopping by, and I hope you'll come back and visit again soon!

Friday, November 22, 2019

Stamped Card Parts

 
I stamped these flowers at our Group Gathering in June. I have SO many card parts to use up, but I'm very slowly whittling them down. For this first one, I started with a white embossed flower on white cardstock. I used distress inks and spread over the entire panel. Then I sprinkled it with water. I used Versamark and white embossing powder for the sentiment, which is from Papertrey Ink.
For this second one, I simply added a sentiment (from Papertrey Ink, also) and a few black pearl drops, along with a matching mat.

Thanks so much for stopping by, and I hope you'll come back and visit again soon!

Thursday, November 21, 2019

BIrthday Roses


I used up a few more card parts on this card. I had the flowers and the leaves already stamped and die-cut. The rose stamp and die are from a Sunny Studio set. The leaves are from Gina K. I did a kind of a fun technique on the leaves that I learned in a Jennifer McGuire video. I stamped the leaves once, using my MISTI, then took a stylus (previously used for "old-fashioned" dry embossing) and "drew" the center line on the stamp for the second stamping. It's a two-step stamping technique, but only uses one stamp. The front-most rose is mounted on foam squares. I added Wink of Stella to the flowers. I also added a few black dots with Liquid Pearls. The sentiment is from Papertrey Ink.

Thanks so much for stopping by, and I hope you'll come back and visit again soon!

Wednesday, November 20, 2019

Happy Anniversary, Annie and Ray!


Happy Anniversary, Annie! Hopefully you have received this card by now.

I die-cut the flowers and backed that piece with tie-dye glitter paper. The sentiment is from Papertrey Ink. (As you can tell from the flurry of anniversary cards, I love this sentiment!)

Thanks so much for stopping by, and I hope you'll come back and visit again soon!

Monday, November 18, 2019

Watercolored Flowers

OK. This card was made with more "card parts." The flowers and leaves were stamped on watercolor paper with Versamark and embossed with black embossing powder and then die-cut. I used watercolor paints to paint them. The large flower is mounted on foam squares. The sentiment is from Papertrey Ink.

Thanks so much for stopping by, and I hope you'll come back and visit again soon!

Sunday, November 17, 2019

Welcome Little One


A couple more baby cards for church. The image is die-cut. The sentiment is from another old dollar stamp set from Studio G.

Thanks so much for stopping by, and I hope you'll come back and visit again soon!

Saturday, November 16, 2019

Teddy Bear Baby


More cards for church. The teddy bear is die-cut. I added tiny enamel dots for the eyes. The sentiment is from an old dollar stamp from JoAnn's from Studio G.

Thanks so much for stopping by, and I hope you'll come back and visit again soon!

Friday, November 15, 2019

Lighthouse Sympathy

Another simple card. The image stamp is from My Favorite Things. The sentiment is from Kaisercraft.

Thanks so much for stopping by, and I hope you'll come back and visit again soon!

Thursday, November 14, 2019

Simple Sympathy

I've been making several cards to bring up to church for the card rack. Most are quite simple. I made two of this design. I simply matted the patterned paper with black and added the die-cut sentiment. On my sympathy cards, I usually add a stamped sentiment.

Thanks so much for stopping by, and I hope you'll come back and visit again soon!

Wednesday, November 13, 2019

Die-Cut Sympathy

I used a die to cut the sentiment three times and layered them for added dimension. I matted with patterned paper and then a matching gray-blue mat. The card base is ivory. I made two of these cards, which will be donated to our church for the card rack.

Edited to add: I was asked by a couple people about the die in this post. It's from Elizabeth Craft and is called "Lovebirds."

Thanks so much for stopping by, and I hope you'll come back and visit again soon!

Tuesday, November 12, 2019

Absolutely the Last Christmas Card for this Year!


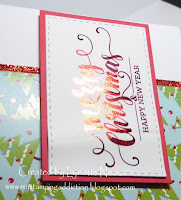
Even if I make more Christmas cards this year, I promise this will be the last one I post. :) I had two of these sentiment panels done and laying on my table, and I wanted them gone. (I have all the parts from my table dealt with. Doesn't mean I don't still have TONS of card parts, but at least the ones that I have taken out have been used.) I used preprinted sentiments from Gina K and then used foil and my laminator to shine them up. The panel is mounted on foam squares. The patterned paper is from Gina K, also.

I am pretty far ahead in my blog posting, with all the cards that I've been making. I'm writing this a week ahead. As of today (November 6) I have my cards all finished, with 15 left over for next year. The insides are done, the envelopes are labled, and, perhaps the hardest part - the cards have been matched up with their recipients. Whew! Now we have to get the Christmas letter written. My calendars are all packaged up. I'm still panicking just a little bit, though, as I have not even thought about shopping yet. Oh well, it's early, right? :)

Thanks so much for stopping by, and I hope you'll come back and visit again soon!

Monday, November 11, 2019

I Just Can't Stop!

OK. Two more Christmas cards done - probably for next year!  I had this sentiment done and wanted to get it off my desk. I had used a Dreamweaver brass stencil, Deco Foil Transfer Gel, gold foil and my laminator to make it. I also used two die-cut frames that had been in my card parts for a while. I glued the frames together and put them around the edge of the card. The patterned paper is from Gina K. 

Of course after trimming the patterned paper for the first card down to size, I was left with a strip of it. Couldn't let it go to waste! I matted it with blue and put it on the side of this card. The sentiment is from Papertrey Ink.

Thanks so much for stopping by, and I hope you'll come back and visit again soon!

Sunday, November 10, 2019

Birdy Birthday

Three more card parts used up. The birds were die cut at our Group Gathering in June. I added them to a die-cut oval. I had stamped the background with a Darcie's stamp and Versamark and embossed with clear embossing powder. I mounted the panel on foam squares. The sentiment is from Taylored Expressions. When we visited there last June, we used a sentiment stamp and die to make several sentiments. This is one that I hadn't used yet.

Edited to add: This die is from Elizabeth Craft and is called "Lovebirds."

Thanks so much for stopping by, and I hope you'll come back and visit again soon!

Saturday, November 9, 2019

Forty-Five Years!

Forty-five years ago today. Oh my! :)

Edited to add: Ah yes. After reading Bonnie's comment, I am reminded that many people commented on the dress the last time I posted this picture. I borrowed it from my sister-in-law! I agree - it's lovely.

Thanks so much for stopping by, and I hope you'll come back and visit again soon!

Friday, November 8, 2019

Those Cute Turtles Again

In my quest to use things up, I had taken the set of turtle stickers out of my drawer awhile back. It's finally gone now! I think they are so cute. :) I cut three small squares from ivory cardstock and then a green strip to mat them. I added the turtles and the sentiment, which is from Papertrey Ink. I used the last two tiny turtles on the inside of the card. Whew! Feels good to even get one small item used up.

Thanks so much for stopping by, and I hope you'll come back and visit again soon!

Thursday, November 7, 2019

It's Your Special Day

In my trip to Hobby Lobby several weeks ago where I purchased a couple (three?) things at 75% off, this embossing folder/die was one of those items. It embosses the flowers and leaves and also cuts out the center. I have had this piece sitting in my pile since the day I bought the folder and finally used it last week on this card. I used textured pink cardstock and lightly sanded it down after embossing. I cut the center out of green and added it to the pink piece. The sentiment is from The Paper Company. I added three "jeweled" enamel dots.

Thanks so much for stopping by, and I hope you'll come back and visit again soon!

Wednesday, November 6, 2019

One Background - Two Cards

At our Group Gathering in June, I got this notecard from a friend. I cut it in half and used it to make these cards. For this first one, I added it to an ivory cardbase. I die-cut several layers of this heart and the sentiment, glued them together and added them to the base.
For this second one, I added thin strips of slightly striped patterned paper. I die-cut the "THANKS" several times and glued them together before adding them.

Thanks so much for stopping by, and I hope you'll come back and visit again soon!

Tuesday, November 5, 2019

They Just Keep on Coming:)

The sentiment piece on this card was stamped, scored and matted a while back. Here it is on a completed card.

The stamp is from Recollections. I stamped it with Versamark ink and embossed with detail gold embossing powder. I added lines with my Scor-Pal and matted it with gold foil. I added it to a piece of textured ivory cardstock and added thin strips of gold glitter tape to the edges. I believe the patterned background may be from The Paper Studio, but I'm not quite sure.

Thanks so much for stopping by, and I hope you'll come back and visit again soon!

Monday, November 4, 2019

Non-Traditional Christmas

I wish I could tell you that now THIS one is my last Christmas card for the year, but I already have more to post! I just can not stop making them. They are my favorite cards to make and I love Christmas stamps.

Anyway, I had this background piece in my small pile of pieces to use up. I had used a Recollections background stamp to make it. I added thin pieces of glitter tape along the top and bottom. The sentiment is from a Papertrey Ink stamp set. The cardbase and stamped panel are both ivory cardstock.

Thanks so much for stopping by, and I hope you'll come back and visit again soon!

Sunday, November 3, 2019

Congrats In School Colors

I really AM on a quest to use up card parts! I pull some out sometimes knowing that I want to use them soon, and then they sit and sit. I just finished up one of those piles on Thursday when I had a friend over to "play." Just to be clear - I have no delusions of EVER using them all up - I just want to at least make progress!!

The blue swirls on this card were cut out at our Group Gathering in June. The piece was actually larger, but this is all that would fit on a standard card. I believe it was part of a layering die set and there were problems with this layer, so of course I had to try my hand at getting it to cut nicely. :) At any rate, it's been sitting out since June and here it is. I did not know what to do with it. I was looking through my small stamp sets and found one from Technique Tuesday that had this little stamp. I decided to stamp it in yellow and make the card the school colors of our local grandsons. The older of the two was recently accepted into the gifted and talented program so I added a Congratulations and will send it to him.


Of course I couldn't send to one of them and not the other, so I used up another card part on this card! :) I had gone to Hobby Lobby in the past month or so and picked up a few things that were 75% off. One of them was the die that cut the stars for this background. I immediately put the die in my die storage and threw away the packaging and I don't remember who it is from. Sorry. I had cut it in silver. I matted it with yellow and then blue. Then I used the blue to cut out some stars to add to it. I used a Cuttlebug alphabet die set to cut the letters. Go Wyatt!

Thanks so much for stopping by, and I hope you'll come back and visit again soon!

Saturday, November 2, 2019

Another Glittery Christmas


I made two cards just like this. Now I have 80 Christmas cards! 

I used an Echo Park stencil for the center panel. I had first tried using the stencil directly on double sided sticky paper. MISTAKE! The stencil stuck horribly! It took a while, but I was able to salvage the stencil. Whew! :) Plan B. I brushed distress ink through the stencil on to the cardstock. Then I cut it in half and ran the pieces through my Xyron machine. After making sure the sticky was stuck really well, I added microfine glitter over each entire piece. I added glitter tape on each side of the panel. The sentiment was done with a Dreamweavers stencil and Deco Foil Transfer Gel. I used platinum foil over the transfer gel.

Thanks so much for stopping by, and I hope you'll come back and visit again soon!