Wednesday, March 31, 2021

Glittery Green Trees Christmas

Using up a few more die-cut and other parts that have been on my stamping table for a while. As I write this (March 27) I have them all used up - or filed! (A few more blog posts to come, though.) Yippee!! I have LOTS in my book, but at least they are off my table. The trees on these cards were cut from dies that I got for Christmas. This first tree is two layers of glittery green, with the top one popped up on foam squares. The dotted paper is from The Paper Studio and the sentiment, embossed in gold, is from Papertrey Ink. I added a piece of brown cardstock for the tree trunk.
More Paper Studio paper on this one and again, the tree is mounted on foam squares. I think the sentiment is from Inkadinkado, but I'm not sure at all. I colored the stars on the sentiment in with a green marker.

Thanks so much for stopping by, and I hope you'll come back and visit again soon!

Tuesday, March 30, 2021

Black, White and Red Christmas

The poinsettia pieces and the sentiment were cut and sitting on my stamping table. The frame piece was a recent addition. I put them all together and added some patterned paper in the frame. Poof! Another Christmas card done.

Thanks so much for stopping by, and I hope you'll come back and visit again soon!

Monday, March 29, 2021

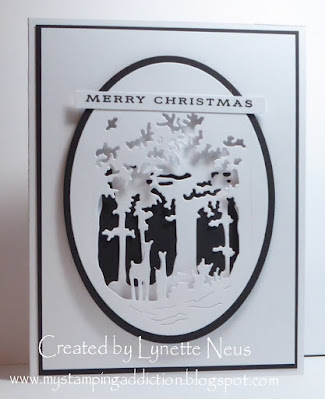
Black and White Christmas

I had previously cut the two pieces of this scene, and finally made a card using them. I cut the front-most again with an oval Nestability. I cut the frame using Nestabilities, also. The framed scene is mounted on foam squares. I matted the other piece with black and added it to a white card base. The sentiment is from Papertrey Ink.

Thanks so much for stopping by, and I hope you'll come back and visit again soon!

Sunday, March 28, 2021

Winter Birthday

All of the items on this card were pre-made and on my stamping table: the dotted background (Altenew, embossed with white on black), the snowman scene and the sentiment. I just combined them! Perfect for a winter birthday, I think. I mounted the snowman scene on foam squares.

Thanks so much for stopping by, and I hope you'll come back and visit again soon!
Saturday, March 27, 2021

Birthday Balloons

I had made this background a few months ago, after I rediscovered my Stampin' Up! wheels. I used the birthday one for this card. The balloons and balloon strings, as well as the black frame, were cut with dies. The yellow balloon is popped up on foam squares.

Thanks so much for stopping by, and I hope you'll come back and visit again soon!

Friday, March 26, 2021

Christmas Thank Yous


These Christmas bells were on my stamping table, too, but now they're gone. :) They were cut three times and glued together. The THANKS and Thank You were already cut and on my table, too. For this first one, I found a piece of blue cardstock, already cut, and embossed it with a Cuttlebug folder. I matted that with a shimmery silver paper. 


For this second one, I glued the bells on to some red cardstock and trimmed around the edges. I used a black piece that I had already embossed with iridescent embossing powder using an Altenew background stamp. I cut that piece with a scalloped-edge die.

Thanks so much for stopping by, and I hope you'll come back and visit again soon!

Thursday, March 25, 2021

Glittery Gold and Black Birthday


I still have several card parts on my table and thought I would work on using them up. These don't even include the ones in my card parts book! Oh well. I'll keep chipping away. I do really love having the parts to use. Sometimes they make for really quick cards.

The parts on this card are the black piece with a die-cut border on the bottom, the gold glittery strips, and the gold glittery butterfly which was cut with a Memory Box die from white a couple times and gold glittery cardstock once and glued together. To finish the card, I stamped the dots and the sentiment - both from an Altenew set - and embossed with gold glitter embossing powder. Then I just added the black piece to an ivory card base and added the glitter strips and butterfly.

Thanks so much for stopping by, and I hope you'll come back and visit again soon!

Wednesday, March 24, 2021

Watercolor Birthday

This is my attempt at watercolor. I watch some watercolor videos while walking on the treadmill in the morning, and it looks so easy! Nah, it's not. :) I stamped the "happy" and "birthday" in Versamark and embossed with black powder. The stamps are from Stampendous. Then I watercolored the background. After drying, I added color to the letters. It'll do! I matted with black and added it to the card base after matting with black. The finished card is 3.5 x 6.25 inches.

Thanks so much for stopping by, and I hope you'll come back and visit again soon!

Tuesday, March 23, 2021

Butterfly Stickers


A small slim-line card for today. The finished card is 3.5 X 6.25 inches. I started with the squares, which were left over from yesterday's card. As always, I just can't bear to throw them out! So, I went to my stickers tote and found these butterfly stickers from Studio 112. I added some doodling around the edges. I embossed the background with a large Cuttlebug folder, then I rubbed white pigment ink over the dots. The sentiment, from Papertrey Ink, is embossed with white powder.

Thanks so much for stopping by, and I hope you'll come back and visit again soon!

Monday, March 22, 2021

Cheery Hello


It always feels so great to make a card after a long break. Well, it seemed like a long break, anyway! Like my last card, this card was in my head when I woke up one day a couple weeks ago. Luckily, I drew a sketch of it right away, or I would have forgotten it for sure.

All of the stamps I used for this card - the branch, the bird and the sentiment - are from the same Hero Arts set. I can tell it's really old, because it was made for Archiver's and Archiver's has been closed for many years. The windows were cut with a Papertrey Ink die. I stamped the branch, added the bird, and then carefully cut them out and colored them very simply with Copic markers. I was able to position the branch and bird so that the white part between the birds feet was on a section between windows. I added the patterned paper - from Bo Bunny - on to the card base and popped up the white panel with the windows and branch.

I had a huge project in my stamping room - took me over a week! My stamps had been in page protector sleeves in three-ring binders. It worked, but I had gotten too many and couldn't sort them out the way I wanted them. I had gotten way behind. So, I went through ALL of them and trimmed down the packaging or made more sleeves for the stamps sets so they now all open from the top. They are all in crates. I'm happy that I have done that! I still haven't gotten them sorted yet, though. They are all such different sizes, that I almost just have to sort them by size. I'm not thrilled with that part. I guess I'll have to play around with them more and see what I can do. The thing I most want to sort out is the stamp sets that are mostly sentiments. I loved having them together. Like I said, it was a huge project and now I have time for making cards again.

Thanks so much for stopping by, and I hope you'll come back and visit again soon!

Wednesday, March 17, 2021

Happy Bird-day!


I woke up the other morning with this card in my head. Well, not the whole card, but just the layout. So, it was the first thing I did that day - made the card. I trimmed off the bottom inch of a standard card. Then I added an inch-thick strip of striped paper to the top of the card front and to the bottom of the inside. I added a thin strip of black to the sides of the striped paper and also to the bottom edge of the front of the card. Then I wasn't sure what to do next! I found this cute bird stamp from Gina K and decided to use it. I colored with Copic markers and added flat black "nail heads" to the eyes. The sentiment is from an old Stampin' Up! set.

Thanks so much for stopping by, and I hope you'll come back and visit again soon!

Tuesday, March 16, 2021

Sunny Flower

A cheery birthday card for today. I've had the completed flower sitting on my desk while I was working on the prayer shawl cards, but it didn't get used for them. So, instead of putting it away again, I added it to a card. I THINK the flower is from My Favorite Things, but I'm really not sure. I drew the stem and leaves and colored them with Copic markers. I embossed a white panel with a Sizzix embossing folder and added it to the left side of the card. The yellow panel's bottom was cut with a die. I added a strip of Washi tape down the edge of the emobssed piece. The sentiment is from Papertrey Ink and is matted and mounted on foam squares. The flower is popped up, also.

Thanks so much for stopping by, and I hope you'll come back and visit again soon!

Sunday, March 14, 2021

Prayer Shawl Cards

I didn't even realize that our church made prayer shawls, but I found out we do. :) I was asked to make some cards to go with the prayers shawls that are given out. I was very happy to do so! The previous cards had this sentiment on them. It had been stamped. The person in charge of the cards wanted to continue using it. So, I printed out the sentiments on my computer. I used many different elements - and almost everything was in my card parts!! A win-win! I used up backgrounds that I had gotten years ago from someone else. I used up backgrounds that I had just made with my gel press. I embossed some backgrounds with embossing folders. I stamped silhouette flowers. I added flowers and leaves that I had stamped and added to my card parts. I used up a LOT of butterflies that were also in my card parts. All-in-all, I made 38 cards. It was fun and they are going to a good cause. I honestly don't know how quickly they will go, but I will happily make more when these are depleted.

Edited to add for my anonymous commenter: Here is a link to the file I created to print the sentiment. I tried the link and it definitely looks different than my original file, but it should help. 

Thanks so much for stopping by, and I hope you'll come back and visit again soon!

Friday, March 12, 2021

Sympathy

My husband's aunt died this week. She was the last aunt or uncle that either of us had. Here is the card I made for her family. I just realized as I was preparing this post that the image was made in combination with my latest card. This image was made by stamping with the gel press after being used on the embossed image from the last card. It's quite light, but I do really like it. I used a die plate for the background. Both the image and the sentiment are from Gina K.

Thanks so much for stopping by, and I hope you'll come back and visit again soon!

Tuesday, March 9, 2021

Let's Craft and Create - Purple and Green Challenge

I'm entering this card (and I guess the second card qualifies, also) into the "Let's Craft and Create" challenge. You can find it here. The challenge is to use purple and green. 

I was going to try to convince a friend (who asked about a gel press) to get a gel press. I just can't do it. I'm not very successful at it! But I have a few pieces that I'm going to use, nonetheless. I used the gel press on both of these cards. First I had stamped and white heat-embossed the image, from Gina K. I used the gel press about three times, I believe. Then I added the dots - from Altenew. The "Hello" die is from Altenew, also. I matted with black and added a few green and purple gems.

Same technique on this card. I matted it with a black piece that I die-cut a few weeks ago. The sentiment is from Hampton Arts. I used a black Perler Pen for the "pearls."

Thanks so much for stopping by, and I hope you'll come back and visit again soon!

Monday, March 8, 2021

Finally!

I have actually spent a fair amount of time in my stamping room lately, but all I've come up with is more card parts! It felt good to finally put something together and make a card. I'm not quite sure where my mojo is, but it will be back, I'm sure!

All of the stamping on this card (flowers, leaves and sentiment) are from the same set from Maya Road. I "fussy-cut" the flowers and leaves. I used the lighter green ink to color the matting for the sentiment. I'm not sure where the paper is from for the bottom, but the top patterned paper is from Die Cuts With a View. I added a piece of gold foil tape between the blue and green patterned papers. I mounted the front-most rose on foam squares.

Thanks so much for stopping by, and I hope you'll come back and visit again soon!

Tuesday, March 2, 2021

Oops - More Christmas Cards!

Well, I've done it again - made more Christmas cards! LOL! I stopped at Hobby Lobby on Saturday, and they had some dies for 75% off and I couldn't resist getting this set. It's by Spellbinders. The set consists of the ornaments, two pieces that make a matting for it, and two different ornament toppers.

On this first card, I used the main die on both white cardstock and gold foil cardstock. Then I used both border pieces on the gold foil and only one on the white. Then I glued the gold onto the white. The ornament toppers were cut from silver foil cardstock. The sentiments on both cards are from a mini-set from Papertrey Ink. I embossed this one with gold. I added a thin strip of gold foil across the top of the white panel. The patterned paper is from a matstack from Recollections.
For this second card, I cut the ornaments, with both borders, from silver glitter cardstock. Then I used just the border pieces to cut the matting for the ornaments out of red. I cut the toppers out of gold glitter cardstock. The patterned papers are from the same matstack as the first card. I stamped the sentiment in black.

Thanks so much for stopping by, and I hope you'll come back and visit again soon!

Monday, March 1, 2021

March Calendar Page

Well, it's March. And I remembered to share my calendar page this month. :) It's not really very often that I forget, but I do know that I forgot all about it last month.

I used a Sizzix die to cut the kite. I added patterned paper from Recollections for the kite itself and colored the bows with a Copic marker. I added gold foil cardstock for the background and a computer-generated sentiment.

You can find the files for my blank calendar in the links under my blog title. Please feel free to use them. I'd love to hear from you, if you do. Actually, I'd love to hear from you for any reason! :)

Thanks so much for stopping by, and I hope you'll come back and visit again soon!