Showing posts with label Lifestyle Crafts Die. Show all posts

Sunday, October 2, 2022

Another Baby Girl

Here is the other card I made for my neighbor when she asked me for baby girl cards. I cut out a teddy bear from baby girl-ish patterned paper from a very old Die Cuts With a View pad. I sponged a bit of pink ink around the edges and added black "nail heads" for the eyes. The ovals were cut with a LifeStyle crafts die set. The patterned paper on the bottom was from the same matstack as the teddy bear, and I also added a thin strip of pink above it. Now, on to the baby boy cards! Hopefully I can get them done soon.

Thanks so much for stopping by, and I hope you'll come back and visit again soon!

Thursday, September 2, 2021

Christmas Stocking

I happened across this Christmas stocking die the other day, and remembered how cute it is. I cut it using Gina K patterned paper and mounted it on foam squares. I had cut the circle a few days ago, too, so I used it on this card. I embossed it with a Darice folder. I embossed the background with a long-retired Sizzix folder. The sentiment is from Papertrey Ink. It's matted with red and mounted on foam squares.

Thanks so much for stopping by, and I hope you'll come back and visit again soon!

Sunday, August 29, 2021

Online Card Class - Day One #3

Here is another card I made for the Online Card Class I'm taking. I ended up liking it more than I thought I would. I cut the hearts and then tore the left-side edges. I inked up along the torn edges. I embossed the top and bottom layers with one of my original Cuttlebug folders and my former favorite - Dotted Swiss. The hearts were cut with Lifestyle Crafts Dies. The heart is popped up on foam squares. The sentiment is stamped in black and is from My Favorite Things. The card base is top-folding.

Thanks so much for stopping by, and I hope you'll come back and visit again soon!

Thursday, August 13, 2020

Graduation Congratulations

The daughter of friends of ours graduated this year. Bummer of a year to graduate, but what can ya do? Her party was held recently. This is the card I made for her. The main panel was done with my JustRite Stamper. I double matted it using school colors. I embossed the top part with a Sizzix folder and the bottom part with a Cuttlebug folder. The sentiment is popped up.
I rarely stamp anything inside my cards - mostly too lazy! But I made an exception for this card. The main sentiment is from Paper Inspirations. The sentiment on the left is the last one that I made at Taylored Expressions last summer. The die cuts are from LifeStyle Crafts/QuicKutz.

Thanks so much for stopping by, and I hope you'll come back and visit again soon!

Friday, July 17, 2020

Thanksgiving in July

The card part on this card is the pumpkin. I'm pretty sure it was cut with a QuicKutz/Lifestyle Crafts die many years ago. I had cut the pieces and then sponged a bit of ink on the edges before gluing them together. I mounted on foam squares. The patterned paper is from a Recollections matstack and is matted with my favorite brown cardstock - Soft Suede from Stampin' Up! The sentiment is from Inkadinkado.

Thanks so much for stopping by, and I hope you'll come back and visit again soon!
Sunday, June 9, 2019

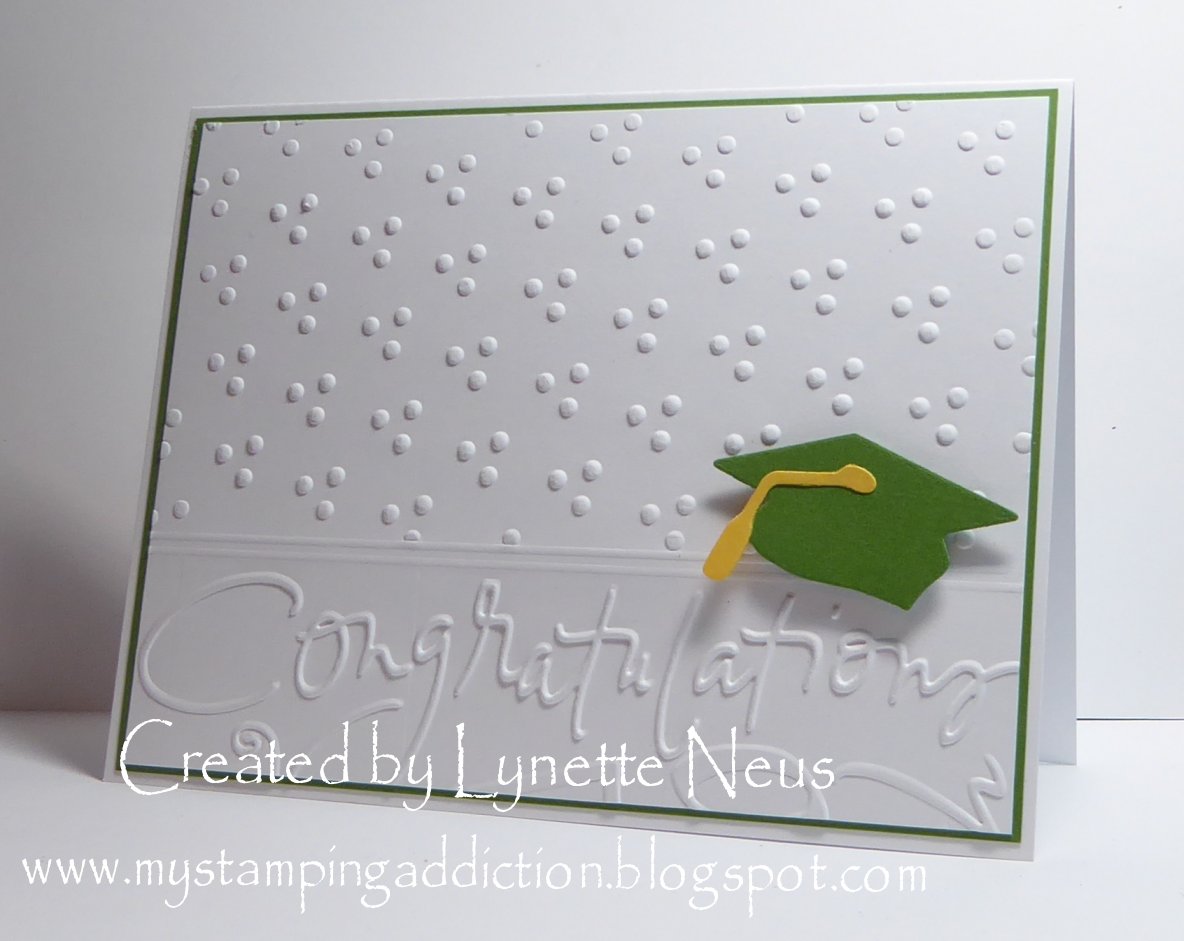
Graduation Congrats

There is nothing new about this card:) I needed a graduation card and this is a classic for me. But, since I share with you nearly ALL of the cards that I make, here you go:)

The top of the white panel was embossed with a Sizzix folder and the bottom was embossed with a Cuttlebug folder. I scored lines between those parts with my Scor-Pal. The hat and tassel were cut with a LifestyleCrafts die. The school colors are green, yellow and white.

Thanks so much for stopping by, and I hope you'll come back and visit again soon!

Saturday, June 2, 2018

Happy Graduation, Emma!

Our niece's youngest daughter graduated this year. Here is the card that I made for her. Her school colors are red and white. The background was embossed with a Cuttlebug folder. The circles were cut with Nestabilities. I popped that panel up on Dimensionals. The graduation hat and diploma were cut with Quickutz/Lifestyle Crafts dies. The diploma is also mounted on a Dimensional.

Thanks so much for stopping by, and I hope you'll come back and visit again soon!

Friday, June 3, 2016

Graduation


 We have need of several congratulation cards, so I had to take some time yesterday to get them made. It was nice to have a little time for card making. I've been spending a fair amount of time at my mom and dad's house, sorting through their things. We're still trying to decide what to do with them. I think I'm leaning towards an estate sale, but I'm not sure yet.

At any rate, here are two graduation cards I made. They are basically the same but with different colors. This first one is for a grandson who is "graduating" from pre-school to kindergarten. The colors in the picture are not very true, but ... The cap is actually a blue foil. It is cut with Lifestyle Crafts dies. The stamping was done with a Stampin' Up! stamp. I cut the circles with Spellbinders dies. The background was embossed with a Cuttlebug folder. I matted with matching blue cardstock. The circles and the hat are mounted on foam squares.

This second card is the same except for the colors. The hat is black with a red tassel. The scalloped circle is red, also. It looks burgundy in the picture, but it truly is red:)


Thanks so much for stopping by, and I hope you'll come back and visit again soon!

Saturday, April 30, 2016

Graduation Congrats

This is the same layout as yesterday's card, but it has a completely different feel to it. It's for our former next-door neighbor who I babysat until he was three. I can't believe he's graduating already! The school colors are blue and yellow, in case you couldn't guess:)

I embossed the background with an old Cuttlebug folder. The graduation cap was done with Lifestyle Crafts dies. The two stamps are from a retired Stampin' Up! set called "Congratulations." (It was in my stack of stamps to use, but I only used these two stamps and called it good enough.) I used the "faux embossing" technique on the "Congratulations" but it's not as effective as it is on green. The blue strip is mounted on foam squares.

Thanks so much for stopping by, and I hope you'll come back and visit again soon!

Wednesday, February 12, 2014

Grandkids' Valentines

I took a few minutes today and finally made valentines for our grandkids. I used two from a few years ago and then made three new ones. VERY simple and not my best, but here they are:) The hearts are all cut using Lifestyle Crafts dies. They are all mounted on foam squares. The patterned paper is from a stack from Recollections.

My mom is still doing about the same. Eating VERY little and sleeping a lot. She will finish up her radiation on Friday and move to a nursing home on Monday. It still seems very surreal. I'll keep you posted. I made a card for her, too, today. I bought a "MOM" file from Silhouette and was going to make a Mother's Day card for her. Had to use it sooner. I'll share it with you tomorrow or Friday.

Thanks so much for stopping by, and I hope you'll come back and visit again soon!

Friday, July 8, 2011

Simple Summery Birthday

I felt like making a super-simple card last week, and this is what "happened."


The flower stamp is from Inkadinkado.  The inks and cardstocks are all from Stampin' Up!  The sentiment is from a Studio G set. The squares were cut with Lifestyles (Quickutz) dies.


Thanks so much for stopping by, and I hope you'll come back and visit again soon!

Tuesday, May 31, 2011

Embossed Thanks - and a Last Chance at a Great Prize

This is a card I made using products available from the Creating Everlasting Memories eBay store.  They are closed through today, and will re-open tonight at 12:01 a.m.  (I'm assuming that's PDT, but that's only a guess!)  The embossing folder, the frame die, and the dragonfly die are all from there and are all from Lifestyle Crafts, formerly Quickutz.


I did a simple little pictorial tutorial, which is posted on the CEM blog, Creating Memories In Time.  I brayered ink onto the embossing folder before embossing.  The ink I used is Kiwi Kiss from Stampin’ Up! I also used Kiwi Kiss cardstock for my matting. The sentiment is from Studio G, stamped in Kiwi Kiss. I cut it with a Lifestyles doodle frames die #DT0095. The outer frame is also Kiwi Kiss. I used Dragonfly #KS0615 die to cut the body of the dragonfly from black cardstock and the wings from vellum.


Also, check out this awesome prize package on the CMIT blog.  You have through today to submit an entry.  One person will be the lucky winner of it all!  All you have to do is to make a Mother's Day card (get a head start for next year!), upload it to your blog or on-line gallery, and link it up to the CMIT blog. The linking widget (is that really a widget?  I don't know!) is down the page a little ways.  Last time I checked, there were only about nine entrants, so your chances of winning are very good!


Thanks so much for stopping by, and I hope you'll come back and visit again soon!

Sunday, May 15, 2011

Phi Beta Kappa Congrats

A quick post for today.  I made this card a few weeks ago.  I was sent a Greek alphabet die cut set, and I really didn't know what to do with it!  I figured a good thing to use it for was for a Phi Beta Kappa inductee.  Anyone know one? :)


The Greek letters were cut with the Lifestyles Crafts alphabet (formerly Quickutz).  The frame was cut with a Lifestyles die, also.  (You can find them both in the Creating Everlasting Memories eBay store.)  The printed paper on the bottom is from Die Cuts With a View.  I added the grosgrain ribbon with white stitching across the bottom, too.  A rather simple but elegant card, I think.


Thanks so much for stopping by, and I hope you'll come back and visit again soon!

Tuesday, April 26, 2011

Birthday Greetings

I was making some new samples for the Creating Everlasting Memories eBay store last night, so I thought I'd share one of them with you.

The die I used is called "Sign."  I cut it out of both black and white cardstock and stamped flowers on the white oval.  The stamp is from a Fiskars set, and I colored it with markers before stamping.  I added tiny pearls to the flower centers.  The sentiment is from Impression Obsession.  I punched the bottom with an EK Success punch and added lines with my Scor-Pal.  If you are interested in the Lifestyle Craft dies (formerly Quicktuz) you can find a link to the CEM store in my blog header.  (A separate page of my blog.)

Thanks so much for stopping by, and I hope you'll come back and visit again soon!

Sunday, April 24, 2011

Happy Easter!

I would like to take this opportunity to wish everyone a very Happy Easter.  I wish you all a good day, and safe travels if you are traveling.

This is the only Easter card I made this year. (I don't normally make them.)  I cut the letters with a Lifestyle Craft Dragonfly alphabet and added Star Dust Stickles to them.  The yellow section was embossed with a Quickutz Scallops embossing folder and I scored the lines with my Scor-Pal.  I matted with blue cardstock.  The patterned paper is from Sizzix.  I added pearls for a little "bling."    Again, Happy Easter to my Christian readers.

(The dragonfly alphabet and the Scallops Embossing folder are available in the Creating Everlasting Memories eBay store.  You can find the links in the second page of my blog by clicking on the CEM eBay Store tab in the header under my blog title.)
 
Thanks so much for stopping by, and I hope you'll come back and visit again soon!

Saturday, April 23, 2011

Teacher Thank You

I've been busy making cards with Lifestyles dies, and having so much fun!

This set combines three die sets.  You can find them all in the Creating Everlasting Memories eBay store, here.  I used DP0089 Apple, DD0088 Stacked Books, and DD0087 Gold Seal.  (And they are all on sale!)  The sentiment on the Gold Seal was printed on my computer and mounted on a foam square.  I cut the apple out of slightly patterned paper, and then used the same paper for the matting.  The black layer is shimmery and I used that same paper to mat the white layer.  The book and apple layer and mat are mounted on foam squares.  The background is embossed with a Cuttlebug Thank You folder.  I scored lines under that layer.  The sentiment is from Fiskars thank you set.  (The set came with hyphens between every "thank-you."  Not sure why!!  I cut them out of each stamp.)

You also still have a few days to upload an Easter card and win a FABULOUS prize!  See the Creating Memories in Time blog for more details.

Thanks so much for stopping by, and I hope you'll come back and visit again soon!

Friday, April 22, 2011

Earth Day

I had this globe die from Lifestyle Crafts and was going to make a card with it.  I thought of Earth Day and checked it out.  Lo and behold - it's today!  So, I made this card yesterday.

The globe is die #DR0091.  I cut it from textured blue, patterned green and shimmery gold. I glued it to the same patterned green, from Sizzix, and matted with the textured blue.  I stamped the letters (intentionally not lined up!) from Image Tree.  Is anyone doing anything special to commemorate Earth Day?

Thanks so much for stopping by, and I hope you'll come back and visit again soon!

Thursday, April 21, 2011

Graduation

A simple graduation card for today.

I cut the graduation cap (from Lifestyle Crafts, formerly Quickutz) from black and white cardstock. I stamped the sentiment with a JustRite Stamper. I cut the plain white circle with a Nestability and the scalloped black circle with a Marvy punch. I mounted the hat and the black circle on foam squares. The background is embossed with a Cuttlebug Argyle embossing folder and is matted with black on a white card base.  EDITED TO ADD:  I replaced the picture with a new one after I added the diploma.  I had forgotten that I wanted it on there!  The diploma is also a Lifestyle die.

Thanks so much for stopping by, and I hope you'll come back and visit again soon!

Tuesday, April 19, 2011

A Shameless CASE! (Thanks, Georgia!)

I rarely copy/CASE someone else's work so completely, but I really liked the Easter card I got from my stamping friend, Georgia, so I made one like it!  Thanks so much, Georgia! (Georgia's card is on the left.)

I dug out some wedding stickers from Mary Englebreit and chose a heart-shaped one.  I cut a hole in the front of the card with a heart die from Lifestyle Crafts (formerly Quickutz.)  I also cut the same size heart in some shimmery silver paper and adhered it to the front of the card.  Then I took a slightly smaller piece of white cardstock and cut the scalloped heart in it and embossed it with a Cuttlebug Swirls folder.  I added the silver ribbon and glued it all together.  The card opens on the top.

Thanks so much for stopping by, and I hope you'll come back and visit again soon!

Wednesday, April 13, 2011

Repeat Impressions - Designer's Choice Challenge

Welcome to the second Designer's Choice Challenge from Repeat Impressions!  Karen chose the challenge for today, and the challenge for the Rock Stars - and for YOU! - is to make a child's birthday or "happy day" card and use some embossing, either dry embossing or "wet" embossing.  Please check out the Repeat Impressions blog, The House That Stamps Built, for all the details.  One random winner for the month will win a full sheet of unmounted rubber.  Also be sure to check out the other designers' blogs:

For my card, I used the Repeat Impressions stamp 628-I, Toy Train.  You can find it on this page.  I stamped it with Memento black ink and colored it with Copic markers.  I just colored a line around the edge and matted it with red cardstock.  I cut the letters using a Lifestyle Crafts die called Dragonfly.  (It's available, among other places, here in the CEM store.) I glued the red and lighter blue letters on the navy background and then embossed with a Cuttlebug Herringbone folder.  The train panel is mounted on foam squares.

Thanks so much for stopping by, and I hope you'll come back and visit again soon!